install wood bed
#1
 03-30-2010, 07:59 AM

Join Date: Apr 2008
Location: fillmore calif.
Posts: 699
Likes: 0
Received 0 Likes
on
0 Posts
install wood bed
when installing the wood in a 56 what is the best way to start? everything is drilled and grooved. boards and strips were rough set for alignment and gas tank filler hole cut. is it best to start with the 4 boards in the center then the
2 end pieces and set the last 2? would not tighten bolts until everything is set and aligned.
2 end pieces and set the last 2? would not tighten bolts until everything is set and aligned.
#2
03-30-2010, 11:14 AM

i don't think there is really a right or wrong way to do this, but i would start with the two end boards as they butt up against the bed sides and therfore are more or less guide pieces. then i would work towards the middle setting the gaps ending up with the middle boards last. that way if you start with the middle boards and they are not centered right, you have to adjust all the boards to get the end ones in.
of course the problem with this method is that if the boards are a little too wide, the best pieces to cut are the two end boards on the non-gooved ends against the bedside so you have to re-adjust anyways.
your choice i guess as to how you want to start.
rgds
Mike
of course the problem with this method is that if the boards are a little too wide, the best pieces to cut are the two end boards on the non-gooved ends against the bedside so you have to re-adjust anyways.
your choice i guess as to how you want to start.
rgds
Mike
#3
03-30-2010, 11:38 AM

Post Fiend
I just replaced the bed of my trailer with a 3/4 sheet of ply wood and it is a little like a chinese puzzle.
Knowing what I know, here's how I'd do it.
First remove your tailgate. Then remove the back roll pan. Make sure ALL the old bolts have been removed - including those holding the bed to the frame. I used a rotary grinder with a cut-off blate to cut through mine.
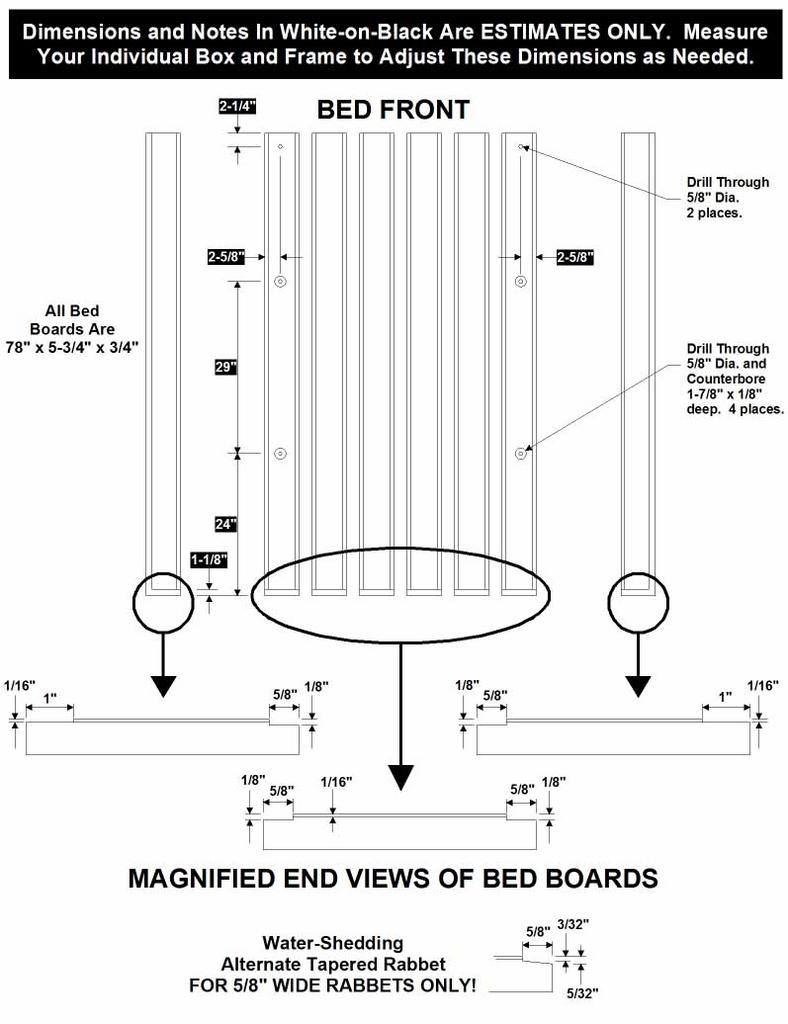
The identify your two outermost boards. They should be cut differently. The outer edges should only be cut 1/16 inch deep the rest should be a little more-like 1/8. Anyway slide those in from the back, thenunder the lip of the box sides.
Next, slide in each board pushing each to the outside and working inward. Do not install any bolts yet.
Then when all the wood is in a fits as it should, place the strips in the grooves and adjust for proper fit. Make sure when doing this that the outer edge under the box lip stays in place and is well under the lip. When this is done, drill the holes for the bolts that hold the outermost boards in alignment withthe holes in the box side (if they are not drilled already) and drop the bolts through all the was around on the sides only - hand tighten.
If the wood is too wide to fit once you get it all in, check that the end boards are all the way under the box lip. Check everything before cutting them. If you have to trim, then it shoudln't be any more than 1/4 inch, do it on the outer edges of the outer boards and re dado those to 1/16 inch. You can do that with a table saw or router.
Then, check spacing on the strips and insert the bolts through the skid strips through the planking. readjust for alighnment, then go under and hand tighten on the fender washers lock washers and bolts.
Once that is done, go under the truck and drill the holes for the main bolts, the ones that go through the wood and hold the box tothe frame. Install those bolts and hand tighten the nuts.
Then, drill the holes for the front and back bolts around the box edge, reinstall the rear roller pan and drill the holes for those bolts. Hand tighten those. All your bolts should be installed now.
Then get under the truck and from the center out lightly tighten the bolts with a wrench (ratchet) to about 10 ft pounds. Work center out to sides and center one row of bolts to the front, one row to the back, etc. until yo have them all slightly tight. Get out and recheck the alignment and fit again.
Then, go under and retighten them all down in the same order as above.
Reinstall the tailgate.
Have fun!
Knowing what I know, here's how I'd do it.
First remove your tailgate. Then remove the back roll pan. Make sure ALL the old bolts have been removed - including those holding the bed to the frame. I used a rotary grinder with a cut-off blate to cut through mine.
The identify your two outermost boards. They should be cut differently. The outer edges should only be cut 1/16 inch deep the rest should be a little more-like 1/8. Anyway slide those in from the back, thenunder the lip of the box sides.
Next, slide in each board pushing each to the outside and working inward. Do not install any bolts yet.
Then when all the wood is in a fits as it should, place the strips in the grooves and adjust for proper fit. Make sure when doing this that the outer edge under the box lip stays in place and is well under the lip. When this is done, drill the holes for the bolts that hold the outermost boards in alignment withthe holes in the box side (if they are not drilled already) and drop the bolts through all the was around on the sides only - hand tighten.
If the wood is too wide to fit once you get it all in, check that the end boards are all the way under the box lip. Check everything before cutting them. If you have to trim, then it shoudln't be any more than 1/4 inch, do it on the outer edges of the outer boards and re dado those to 1/16 inch. You can do that with a table saw or router.
Then, check spacing on the strips and insert the bolts through the skid strips through the planking. readjust for alighnment, then go under and hand tighten on the fender washers lock washers and bolts.
Once that is done, go under the truck and drill the holes for the main bolts, the ones that go through the wood and hold the box tothe frame. Install those bolts and hand tighten the nuts.
Then, drill the holes for the front and back bolts around the box edge, reinstall the rear roller pan and drill the holes for those bolts. Hand tighten those. All your bolts should be installed now.
Then get under the truck and from the center out lightly tighten the bolts with a wrench (ratchet) to about 10 ft pounds. Work center out to sides and center one row of bolts to the front, one row to the back, etc. until yo have them all slightly tight. Get out and recheck the alignment and fit again.
Then, go under and retighten them all down in the same order as above.
Reinstall the tailgate.
Have fun!
#4
03-30-2010, 12:57 PM
Junior User
Join Date: Dec 2006
Location: no. ca.
Posts: 78
Likes: 0
Received 0 Likes
on
0 Posts
#5
03-30-2010, 01:07 PM
I kept a couple magazines that showed how to do it. They said to start with the two on the outside and work your way to the center rather than going one direction with it all when putting the wood in (not tightening, just lining up the slats). They also mentioned leaving a tiny gap at the far end (opposite tailgate) so it didn't squeak.
Haven't done it myself though so take it with a grain of salt, lol.
Haven't done it myself though so take it with a grain of salt, lol.

#7
03-30-2010, 09:13 PM
Join Date: Apr 2008
Location: fillmore calif.
Posts: 699
Likes: 0
Received 0 Likes
on
0 Posts
thanks for the reply's. started installing it from center. hardest part of the whole thing was tightening the bolts on the last support. has about 1 1/2 inches of room from the tank to the support. also the roll pan doesn't give much room either. other than that everything "BOLTS" right up. 
Trending Topics
#8
03-30-2010, 09:18 PM
Post Fiend
Julie, Do you have pictures of your putting the wood in? Did you seal the wood and if you did , what did you use? What kind of wood? Was it a kit or did you make your own boards? From your description of your garage in another post, you have the tools to make your own boards. Tim
I have a final product picture. The was on my trailer that I'm making outof the back half of a 51 F1.
I specifically wanted a plywood sheet bed both to save expense on wood and strips, and make it easy to replace.
The top I soaked in WATCO Danish OIL for exterior surfaces, then top coated with Minwax Spar Varnish. I expect to beat on this wood - which is why I have the trailer, my truck is taking a beating. I undercoated the bottom.
If you are wondering about the best way to finish your planking, there are a number of good posts here to refere to with great ideas. Also, the MAR-K company has done an extensive number of tests on wood finishing and have those studies on their web site. In short, apply a penetrating poly based oil product, then top coat with exterior varnish - Spar!
Here is the link to our previous discussions, and to MAR-K!
https://www.ford-trucks.com/forums/8...od-finish.html
https://www.ford-trucks.com/forums/7...d-install.html
MAR-K Classic Truck Parts made in Oklahoma City, USA
#9
03-30-2010, 10:57 PM

#10
03-31-2010, 02:20 AM
Post Fiend
#11
03-31-2010, 10:17 AM

Thread
Thread Starter
Forum
Replies
Last Post
Cougar54
1948 - 1956 F1, F100 & Larger F-Series Trucks
11
07-04-2016 11:01 PM
F100Central
1948 - 1956 F1, F100 & Larger F-Series Trucks
8
10-04-2006 06:30 PM