1974 Ford Cummins Crew cab
#1216
 04-27-2012, 09:58 PM


Was wondering a similar question, in my current project I have to make new hard lines for my tranny cooler and was considering aluminum because I see Summit has anodized red or blue line in 3/8 or 1/2"
#1217
04-30-2012, 12:57 PM
so the board was freaking out on Friday when I tried 2 or 3 times to reply to Fordworth...
He is where I got the pedal idea from.
Also that last long post of mine was only 1/2 the story. I have one more night's work to post about but haven't had the time as of yet. Gotta get some more work done now but will post in a bit.
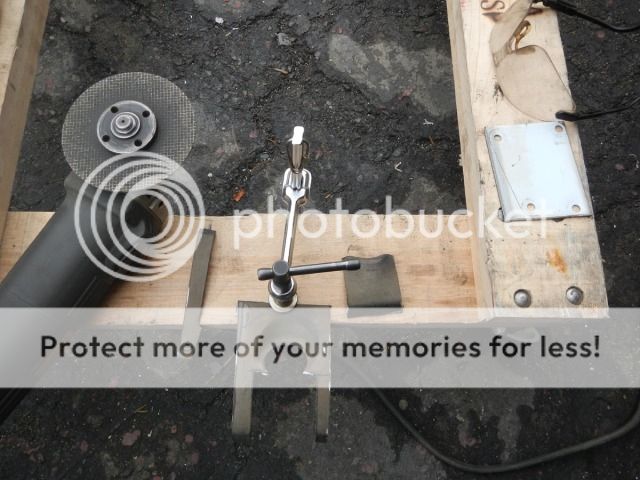
Which pedal? The stock 70's one? If so I describe it in the post. I pretty much just cut it where you see in the pic. The arm of the stock pedal that extended into the engine bay was cut off.
He is where I got the pedal idea from.
Also that last long post of mine was only 1/2 the story. I have one more night's work to post about but haven't had the time as of yet. Gotta get some more work done now but will post in a bit.
Which pedal? The stock 70's one? If so I describe it in the post. I pretty much just cut it where you see in the pic. The arm of the stock pedal that extended into the engine bay was cut off.
#1218
04-30-2012, 02:14 PM
This continues from Friday after the other long post. I meant to post this up at the same time but got busy with work & ran out of time....
So I got back in the shop again last night.
I picked up with the throttle & pedal where I left off from the night before.
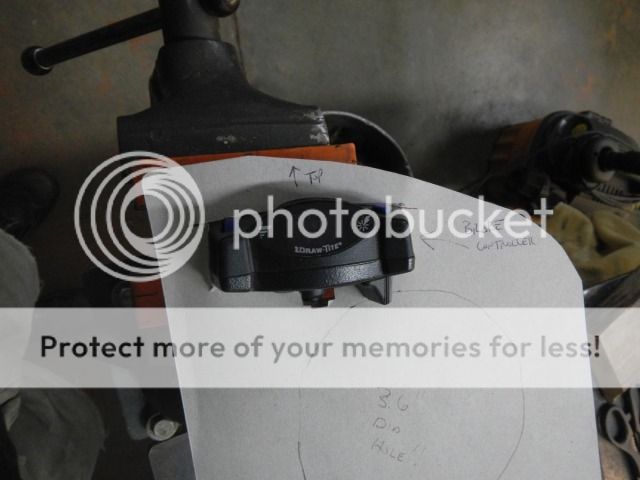
I messed with gas pedal to get it right with throttle cable. It took a couple tries of tacking, cycling & adjusting but I got that done. I ended up adding a new base/foot for the bottom of the pedal to use as a stop so I don't stretch or brake cable as pedal was about 1/8" to 1/4" above floor at full throttle.

Here's a pic of welding that stop on. I also had the part of the 96 bronco pedal welded 1/2 way here. Later I cut off the little excess/overhang and welded the rest up

While the pedal was cooling from the welding I started looking at the throttle cable. I guess there was a recall on the mid 90's throttle linkage stuff and I had bought a kit a LONG time ago to fix this (since it also came with the throttle cable & was CHEAP), so I finally did all that. It consisted of replacing the ball & socket stuff on the bellcranks.
Once I got that done I removed TPS as I put the assemble back on the truck. I did this just to clean the stuff up a bit as I won't be using the TPS.
At this time I started to kind of look at the cable I bought to replace the fuel shut off solenoid. I found a good, existing hole (again it looks like on from the rubber plug/mount things that hold on the factory fire wall sound deadening) and ran the cable through there. I still need to mess with a bracket to hold the cable on either but I'll mess with that in a bit.
At this point I went back to the dash and mounting all the goodies on that.
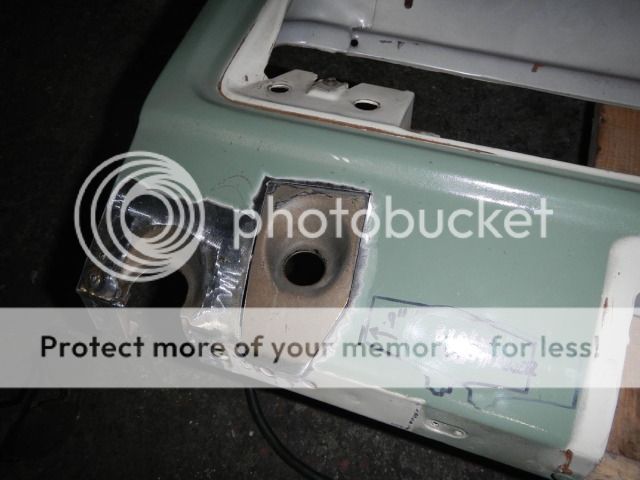
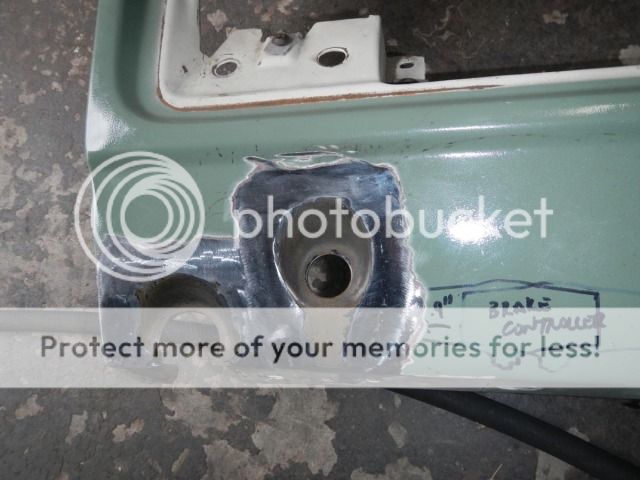
The 1st focus was the adjustable proportioning valve & the line lock I'll use as a temporary parking brake. I wanted to make sure I had room for the other goodies I want though so I dug up my trailer brake & the faceplate for my "race radio" (ham type radios we use to talk with the race trucks & other chase crews) to see how they'd fit.
After doing a little layout I started messing with the pieces I had cut out of the spare dash
I traced the trailer brake shape on cardboard to transfer it to the dash for clean cutting.
This is what we've got after a little tweaking.

Figuring I was going to do this & there was no turning back I started really cutting into my nice dash. This was hard to do but hopefully will be worth it in the long run.
As I left it I was messing with this piece to try & tack it.

I was hoping to get back in the shop for a bit this weekend so I could mess with this but I didn't have time so, I'll be back at it tonight.
So I got back in the shop again last night.
I picked up with the throttle & pedal where I left off from the night before.
I messed with gas pedal to get it right with throttle cable. It took a couple tries of tacking, cycling & adjusting but I got that done. I ended up adding a new base/foot for the bottom of the pedal to use as a stop so I don't stretch or brake cable as pedal was about 1/8" to 1/4" above floor at full throttle.
Here's a pic of welding that stop on. I also had the part of the 96 bronco pedal welded 1/2 way here. Later I cut off the little excess/overhang and welded the rest up
While the pedal was cooling from the welding I started looking at the throttle cable. I guess there was a recall on the mid 90's throttle linkage stuff and I had bought a kit a LONG time ago to fix this (since it also came with the throttle cable & was CHEAP), so I finally did all that. It consisted of replacing the ball & socket stuff on the bellcranks.
Once I got that done I removed TPS as I put the assemble back on the truck. I did this just to clean the stuff up a bit as I won't be using the TPS.
At this time I started to kind of look at the cable I bought to replace the fuel shut off solenoid. I found a good, existing hole (again it looks like on from the rubber plug/mount things that hold on the factory fire wall sound deadening) and ran the cable through there. I still need to mess with a bracket to hold the cable on either but I'll mess with that in a bit.
At this point I went back to the dash and mounting all the goodies on that.
The 1st focus was the adjustable proportioning valve & the line lock I'll use as a temporary parking brake. I wanted to make sure I had room for the other goodies I want though so I dug up my trailer brake & the faceplate for my "race radio" (ham type radios we use to talk with the race trucks & other chase crews) to see how they'd fit.
After doing a little layout I started messing with the pieces I had cut out of the spare dash
I traced the trailer brake shape on cardboard to transfer it to the dash for clean cutting.
This is what we've got after a little tweaking.
Figuring I was going to do this & there was no turning back I started really cutting into my nice dash. This was hard to do but hopefully will be worth it in the long run.
As I left it I was messing with this piece to try & tack it.
I was hoping to get back in the shop for a bit this weekend so I could mess with this but I didn't have time so, I'll be back at it tonight.
#1220
04-30-2012, 05:24 PM
Elder User
Join Date: Aug 2009
Location: Ontario, Canada
Posts: 527
Likes: 0
Received 0 Likes
on
0 Posts
Looks good so far. I like the idea about another cig lighter/12v outlet. I just might have to install one as well. I did something very similar with my pedel, but i fabbed a custom end out of ss hex bar and round bar. I'll post a pic in my build thread when i get a chance. It did take a little messin around to find the sweet spot as well.
#1221
05-01-2012, 01:24 PM
So more time spent on the dash last night. Body work sucks - as does MIG welding. Oh well...
Lots of pics for you to enjoy at least!
I had to break out the clecos even!
Oh, and before I start on that. Here's a quick shot of the clutch fluid reservoir I made. I won't take the protective paper off the stainless til the thing leaves the shop in like 5 years...

And onto the dash pics. I made some OK progress, but it was slow going.


Here's one with the line lock held in temporarily to see what it will look like
And here's the mount for the adjustable prop valve. The bend in it came out just right & makes the thing sit perfect.

Here's how I left off. More sanding to do, but it's almost there
Lots of pics for you to enjoy at least!
I had to break out the clecos even!
Oh, and before I start on that. Here's a quick shot of the clutch fluid reservoir I made. I won't take the protective paper off the stainless til the thing leaves the shop in like 5 years...
And onto the dash pics. I made some OK progress, but it was slow going.
Here's one with the line lock held in temporarily to see what it will look like
And here's the mount for the adjustable prop valve. The bend in it came out just right & makes the thing sit perfect.
Here's how I left off. More sanding to do, but it's almost there
#1222
05-04-2012, 08:55 AM
Senior User
Join Date: Feb 2009
Location: Santa Maria, CA
Posts: 148
Likes: 0
Received 0 Likes
on
0 Posts
#1223
05-04-2012, 02:10 PM
Thanks.
Had another "ADD night" at the shop. I guess that's what I get when there is SO much left to be done on this thing that I don't even know where to start...
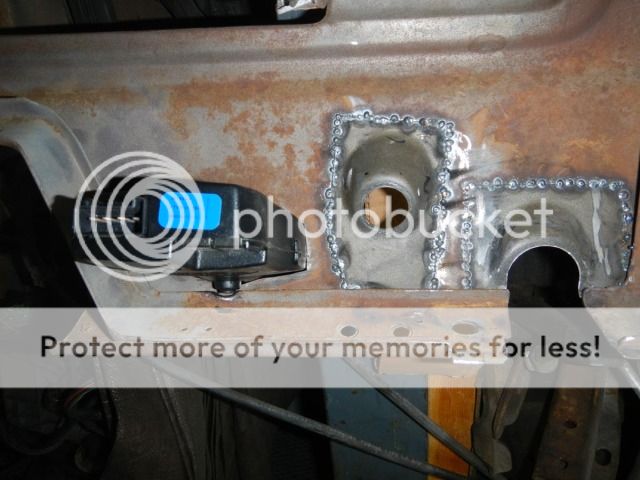
I started by looking at the fuel tank dimensions I had done a while ago. I had cut a piece of cardboard cut to represent the top of the tank a long while back, so I made a side last night to check dimensions.

All seems good fit/location wise so I decided to try a new toy I bought... After hearing people say the heavy duty snap on impact hammers are good at removing the Ford rivets I broke down & bought one a little while ago. I was scared off by the $350-400 price tag so I hounded eBay for a while & picked one up for well less than half of that shipped
I decided since I was going to need to remove those 2 cross members in the back (I'm relocating them) that now better time than now to try my new toy!
It worked pretty good for taking the heads off, but not as good as I had hoped for pounding the things out. I ended up doing much of that with the same drift & sledge I always use
Once I got all the bottom rivets (the ones I can get to without pulling the bed) it was time to move on.
So I looked at brake lines again briefly & figured out how I plan on going through the firewall with the lines.
I then looked briefly at the clutch pedal/plunger setup again, got nervous again and moved on. I am nervous about getting the "throw" on the pedal right & wanting to make sure I get the plunge depth right. I keep debating on whether or not I should cut the plunger & thread it so I can make the length adjustable. Oh well - skipped that & moved on...
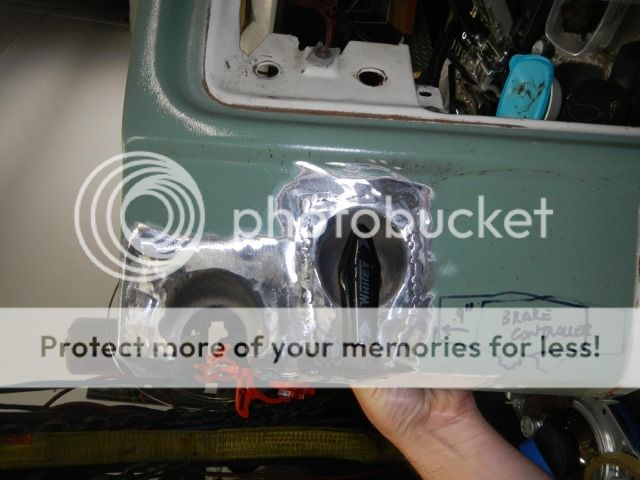
Back to the dash I go. I got the trailer brake cut into the dash. Now I just gotta make tabs for it.

I'm thinking this will be it on the dash for a while - not sure. I do have to look at the cable mount for the fuel shutoff, but that should be easy - hopefully.
Also I want to look at doing a cool mount for the display for my race radio but that can come later.
Oh and I need to figure out what I will do for my gauge mount. Original thought was to replace the factory plastic surround & everything for the gauges & build one out of aluminum or stainless. I'm getting lazy & impatient though & may just rig up something to mount the autometers within the factory surround/bezel.
Had another "ADD night" at the shop. I guess that's what I get when there is SO much left to be done on this thing that I don't even know where to start...
I started by looking at the fuel tank dimensions I had done a while ago. I had cut a piece of cardboard cut to represent the top of the tank a long while back, so I made a side last night to check dimensions.
All seems good fit/location wise so I decided to try a new toy I bought... After hearing people say the heavy duty snap on impact hammers are good at removing the Ford rivets I broke down & bought one a little while ago. I was scared off by the $350-400 price tag so I hounded eBay for a while & picked one up for well less than half of that shipped
I decided since I was going to need to remove those 2 cross members in the back (I'm relocating them) that now better time than now to try my new toy!
It worked pretty good for taking the heads off, but not as good as I had hoped for pounding the things out. I ended up doing much of that with the same drift & sledge I always use
Once I got all the bottom rivets (the ones I can get to without pulling the bed) it was time to move on.
So I looked at brake lines again briefly & figured out how I plan on going through the firewall with the lines.
I then looked briefly at the clutch pedal/plunger setup again, got nervous again and moved on. I am nervous about getting the "throw" on the pedal right & wanting to make sure I get the plunge depth right. I keep debating on whether or not I should cut the plunger & thread it so I can make the length adjustable. Oh well - skipped that & moved on...
Back to the dash I go. I got the trailer brake cut into the dash. Now I just gotta make tabs for it.
I'm thinking this will be it on the dash for a while - not sure. I do have to look at the cable mount for the fuel shutoff, but that should be easy - hopefully.
Also I want to look at doing a cool mount for the display for my race radio but that can come later.
Oh and I need to figure out what I will do for my gauge mount. Original thought was to replace the factory plastic surround & everything for the gauges & build one out of aluminum or stainless. I'm getting lazy & impatient though & may just rig up something to mount the autometers within the factory surround/bezel.
#1224
05-04-2012, 06:13 PM
Cargo Master
I finally figured out what your after on the pedal. Just had to stare at it for a while.
I never tried cutting the heads off the rivets with that Snap On air hammer, I just used it to punch them out. Occasionally I would run into a ornery one but I would go to work on the next ones until the compressor would kick on and then I could get out the stubborn ones.
Maybe the heat from the plasma cutter(rivet head removal) was helping move things along?
#1226
05-04-2012, 06:17 PM
#1227
05-04-2012, 10:46 PM
Laughing Gas
Join Date: Dec 2007
Location: Alvarado, TX
Posts: 1,048
Likes: 0
Received 0 Likes
on
0 Posts
75 and 90??? What can you accomplish with that? My little compressor at home is at 120 and the big one at the yard is at 175. The only problem I run into with my cheap air hammer is melting down the chisels but it will tear some crap up for sure.
#1228
05-05-2012, 12:58 AM
#1229
05-07-2012, 12:11 PM
snap-on said 90 PSI max on the side so that is where the 90 came from. I guessed at the 75 for what the compressor was currently set at. Reality is I had no clue what it was at. I say 75 because that's what I had it set for the plasma which was the last time I remember setting it. That was months ago now and the thing is buried & semi hard to get to so I never adjust it....
Whenever I get back to messing with rivets (need to take the bed off - so no clue when I'll get to it) I'll see what the PSI is & bump it up.
Whenever I get back to messing with rivets (need to take the bed off - so no clue when I'll get to it) I'll see what the PSI is & bump it up.
#1230
05-07-2012, 11:56 PM