How To: Power window regulator replacement on 07+ Expedition
#1
 09-03-2012, 12:59 PM

Join Date: Jun 2011
Location: Orlando, FL
Posts: 123
Likes: 0
Received 0 Likes
on
0 Posts
How To: Power window regulator replacement on 07+ Expedition
<!--[if gte mso 9]><xml> <w:WordDocument> <w:View>Normal</w:View> <w:Zoom>0</w:Zoom> <w:Compatibility> <w:BreakWrappedTables/> <w:SnapToGridInCell/> <w:WrapTextWithPunct/> <w:UseAsianBreakRules/> </w:Compatibility> <w:BrowserLevel>MicrosoftInternetExplorer4</w:BrowserLevel> </w:WordDocument> </xml><![endif]-->
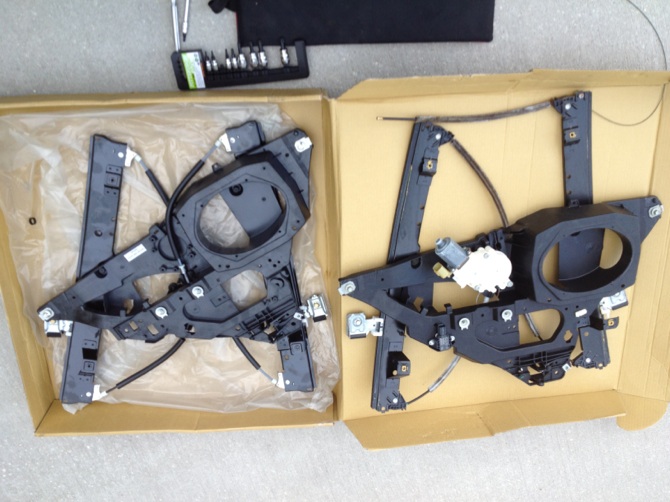
Hopefully this can help others fix the same issue themselves. Its not that hard. Took me about an hr, and that was while baby sitting my 5 year old as she played in and out of the truck.
A couple months ago I put down the passenger window and heard this horrible crunching sound. And the window stopped. I could still here the motor. I put it up by hand but it would fall while driving. I played with the switch and managed to get it to go up and left it there till I could get the time to fix it.
I got the new regulator from Autozone, approx $150, does not come with a new motor.
I have the factory service manuals so I did my homework and attacked it yesterday.
To remove the door panel
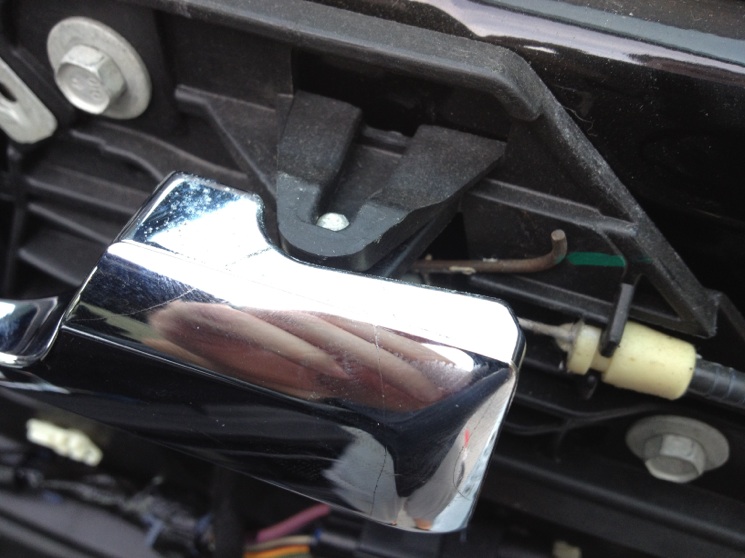
Remove the screw cover by the door handle with a small screw driver/hook
Remove the screw
Remove the door handle cover, it just pops out.
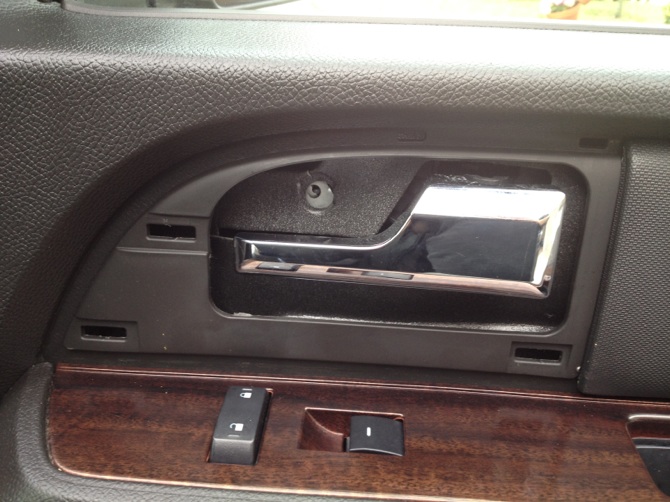
In the door pull, there are 2 screws down in there, pop the cover with a small hook, and remove the screws
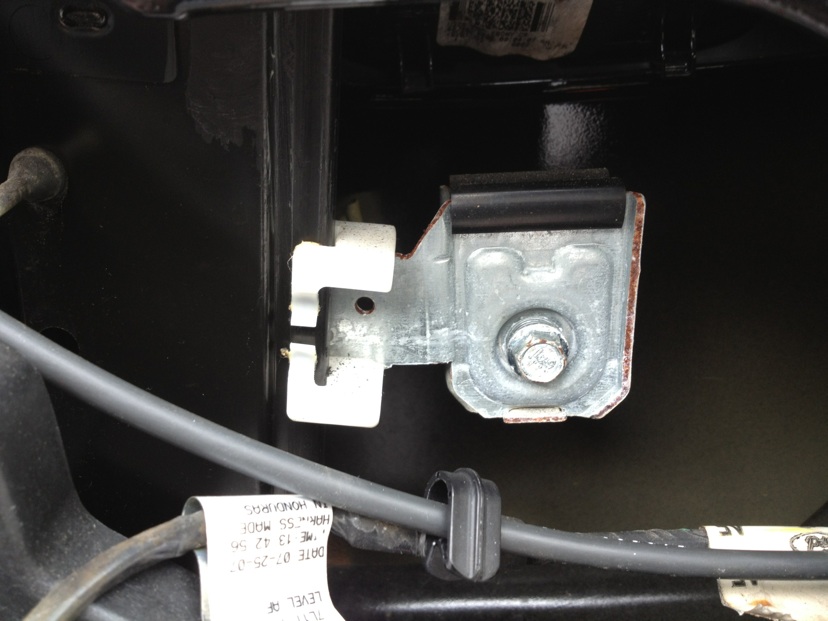
On the side of the door panel (rear edge above the latch assembly), there is a small round cover with a screw inside, remove that too.
Remove the two screws on the bottom of the door panel.
Pry out on the top point (where the small speaker is) to disengage the clip, then the door panel should lift straight up and then off the door. It hooks on. Don’t force anything. Gently work it and it will come off.
Unplug the wiring for the tweeter, door locks and windows
You’re now looking at the door with no panel
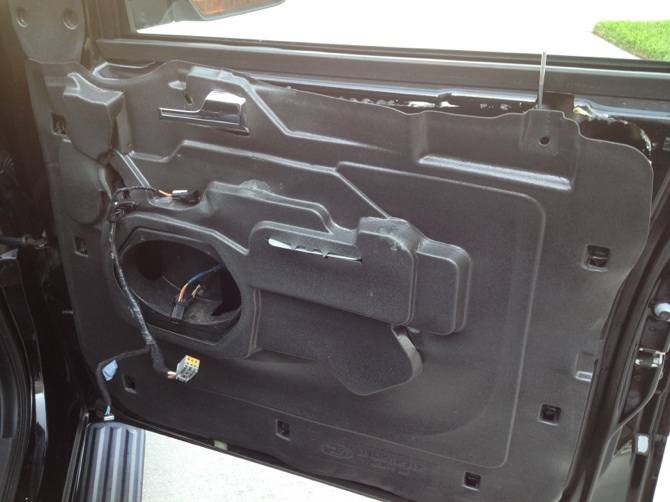
Remove the speaker, disconnect the wiring
Take your time and pry off the weather shield, pull by the glue, not the shield and it should stick back on

Remove the door pull mount
Remove the door handle
Gently pry up where the top pin is engaged, and rotate the handle down and out
Disconnect the cable
Now is when you unbolt the glass from the regulator
Go back to your door panel and remove the power window switch. There are 4 hooks holding it in. Disengage each hook while putting pressure on the switch to push it into the door panel. Once all 4 teeth are unhooked it will pop out.
Hook up the power window switch. Key in Acc position.
Lower the window about 6” so you can see both clamp bolts on the tracks.
Loose the bolts (don’t remove) When the bolt is loose you can push on the bolt to work the clamp loose
Once the window is free, push it up so its closed. I used some 2” painters tape to keep it closed.
Now’s a good time to disconnect the battery.
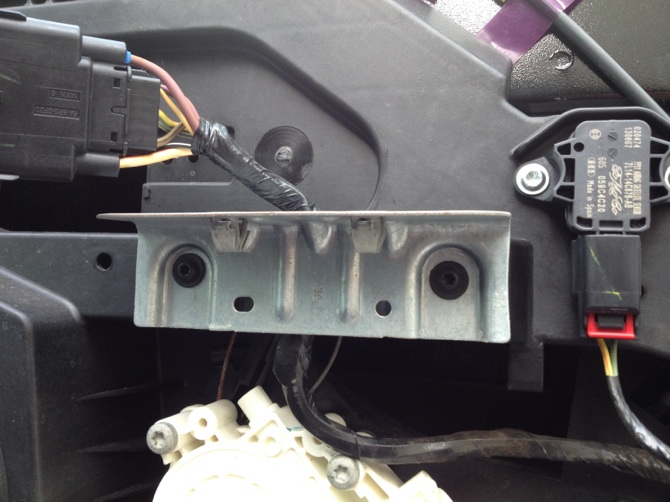
Remove the rest of the wiring including the power window motor and side air back sensor.
Work on the bolts in this order
Remove the yellow numbered bolts
Loosen the red numbered bolts
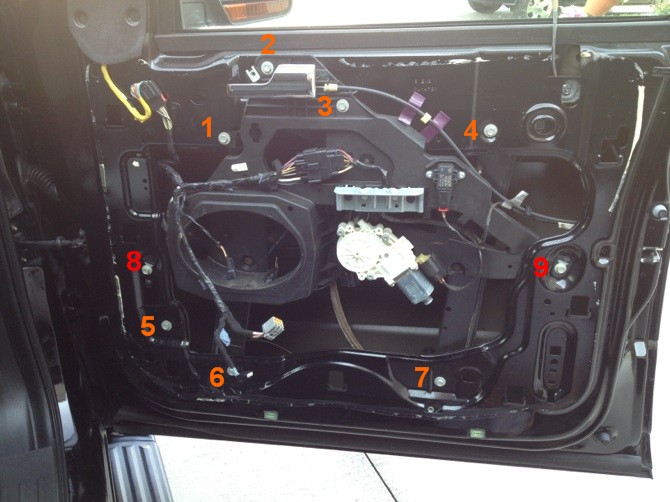
(Ford calls the red numbered bolts – hanger bolts
They are able to come though a larger hole and slide into a slot to hold the regulator in place while you are installing the rest of the bolts.)
The regulator should be loose now. I found it easiest to move it down into the door, then towards the rear. Then rotate the front of the regulator up and out.
You now have an empty door
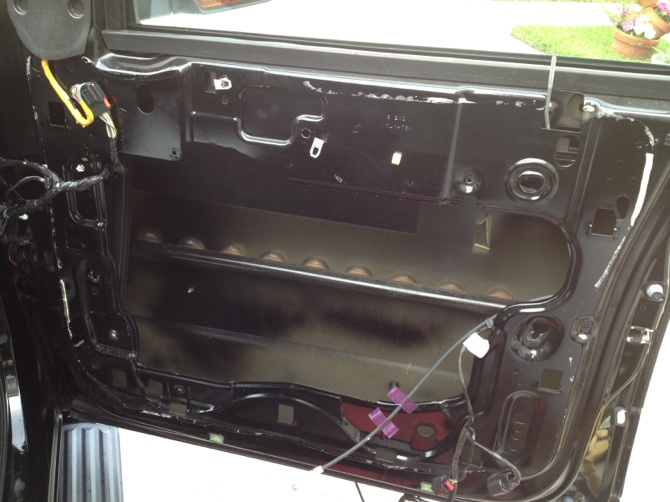
Put the regulators side by side and move over any clips, the air bag sensor and the power window motor. Tracks are greasy so don’t make a mess or drop it.
Connect the battery
Test
Re-Assembly
Basically reverse all the instructions.
Put the window switch back in the door panel
Put the new regulator in the door and mount it on the hanger bolts
Secure the remaining bolts
Take the tape off the window, and let it down into the clamps
Tighten the clamps
Connect the wiring (power window and air bag)
Put the door latch back on
Install the weather shield
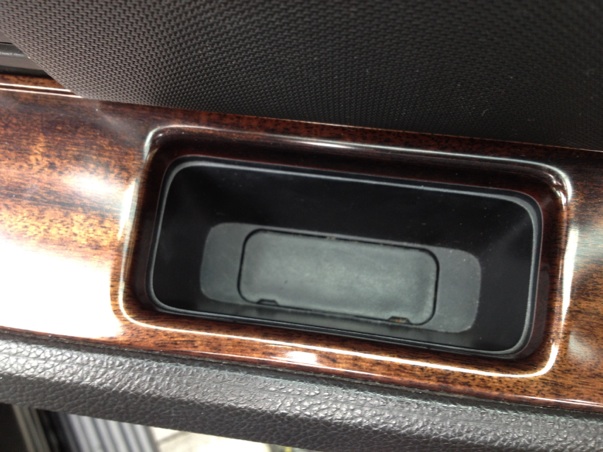
Door pull mount
Speaker
Wiring
And the door panel (don’t forget to put the power window switch back in first)
This new regulator works much faster than before. I should have known something was wrong or about to break.
I went ahead and took off the driver’s door panel too, as that window seemed to be slow.
The regulator tracks were dry! I added some grease as best I could and sprayed some lube on the cable as I cycled the window a couple times (there’s a opening near the power window motor where you can see the cable moving)
Now it too moves much faster!
NOTE: If you’re doing the drivers door with the auto switch (or either passenger or drivers on a navigator) the manual mentions an initialization procedure. I guess so the motor knows what’s up and what’s down. I don’t know what this procedure is, I assume its something a dealer needs to do.
<!--[if gte mso 10]> <style> /* Style Definitions */ table.MsoNormalTable {mso-style-name:"Table Normal"; mso-tstyle-rowband-size:0; mso-tstyle-colband-size:0; mso-style-noshow:yes; mso-style-parent:""; mso-padding-alt:0in 5.4pt 0in 5.4pt; mso-para-margin:0in; mso-para-margin-bottom:.0001pt; mso-pagination:widow-orphan; font-size:10.0pt; font-family:"Times New Roman";} </style> <![endif]-->
Hopefully this can help others fix the same issue themselves. Its not that hard. Took me about an hr, and that was while baby sitting my 5 year old as she played in and out of the truck.
A couple months ago I put down the passenger window and heard this horrible crunching sound. And the window stopped. I could still here the motor. I put it up by hand but it would fall while driving. I played with the switch and managed to get it to go up and left it there till I could get the time to fix it.
I got the new regulator from Autozone, approx $150, does not come with a new motor.
I have the factory service manuals so I did my homework and attacked it yesterday.
To remove the door panel
Remove the screw cover by the door handle with a small screw driver/hook
Remove the screw
Remove the door handle cover, it just pops out.
In the door pull, there are 2 screws down in there, pop the cover with a small hook, and remove the screws
On the side of the door panel (rear edge above the latch assembly), there is a small round cover with a screw inside, remove that too.
Remove the two screws on the bottom of the door panel.
Pry out on the top point (where the small speaker is) to disengage the clip, then the door panel should lift straight up and then off the door. It hooks on. Don’t force anything. Gently work it and it will come off.
Unplug the wiring for the tweeter, door locks and windows
You’re now looking at the door with no panel
Remove the speaker, disconnect the wiring
Take your time and pry off the weather shield, pull by the glue, not the shield and it should stick back on
Remove the door pull mount
Remove the door handle
Gently pry up where the top pin is engaged, and rotate the handle down and out
Disconnect the cable
Now is when you unbolt the glass from the regulator
Go back to your door panel and remove the power window switch. There are 4 hooks holding it in. Disengage each hook while putting pressure on the switch to push it into the door panel. Once all 4 teeth are unhooked it will pop out.
Hook up the power window switch. Key in Acc position.
Lower the window about 6” so you can see both clamp bolts on the tracks.
Loose the bolts (don’t remove) When the bolt is loose you can push on the bolt to work the clamp loose
Once the window is free, push it up so its closed. I used some 2” painters tape to keep it closed.
Now’s a good time to disconnect the battery.
Remove the rest of the wiring including the power window motor and side air back sensor.
Work on the bolts in this order
Remove the yellow numbered bolts
Loosen the red numbered bolts
(Ford calls the red numbered bolts – hanger bolts
They are able to come though a larger hole and slide into a slot to hold the regulator in place while you are installing the rest of the bolts.)
The regulator should be loose now. I found it easiest to move it down into the door, then towards the rear. Then rotate the front of the regulator up and out.
You now have an empty door
Put the regulators side by side and move over any clips, the air bag sensor and the power window motor. Tracks are greasy so don’t make a mess or drop it.
Connect the battery
Test
Re-Assembly
Basically reverse all the instructions.
Put the window switch back in the door panel
Put the new regulator in the door and mount it on the hanger bolts
Secure the remaining bolts
Take the tape off the window, and let it down into the clamps
Tighten the clamps
Connect the wiring (power window and air bag)
Put the door latch back on
Install the weather shield
Door pull mount
Speaker
Wiring
And the door panel (don’t forget to put the power window switch back in first)
This new regulator works much faster than before. I should have known something was wrong or about to break.
I went ahead and took off the driver’s door panel too, as that window seemed to be slow.
The regulator tracks were dry! I added some grease as best I could and sprayed some lube on the cable as I cycled the window a couple times (there’s a opening near the power window motor where you can see the cable moving)
Now it too moves much faster!
NOTE: If you’re doing the drivers door with the auto switch (or either passenger or drivers on a navigator) the manual mentions an initialization procedure. I guess so the motor knows what’s up and what’s down. I don’t know what this procedure is, I assume its something a dealer needs to do.
<!--[if gte mso 10]> <style> /* Style Definitions */ table.MsoNormalTable {mso-style-name:"Table Normal"; mso-tstyle-rowband-size:0; mso-tstyle-colband-size:0; mso-style-noshow:yes; mso-style-parent:""; mso-padding-alt:0in 5.4pt 0in 5.4pt; mso-para-margin:0in; mso-para-margin-bottom:.0001pt; mso-pagination:widow-orphan; font-size:10.0pt; font-family:"Times New Roman";} </style> <![endif]-->
#2
09-03-2012, 06:28 PM
NOTE: If you�re doing the drivers door with the auto switch (or either passenger or drivers on a navigator) the manual mentions an initialization procedure. I guess so the motor knows what�s up and what�s down. I don�t know what this procedure is, I assume its something a dealer needs to do.

Second, here is my contribution to this thread.
Window Motor Initialization
NOTE: Initialization is required to learn both the full up and full down positions and the profile of the glass as it travels through the glass channel. Once initialized, obstacle detection is enabled. This procedure is only required for Navigator (LF and RF) or Expedition (LF only) window motors.
NOTE: The window motor must be reinitialized whenever: the motor is removed from window regulator drum housing, a new motor is installed, a new window regulator is installed, new window glass is installed, glass top run removal or installation is carried out or when carrying out any operation in which grease or lubricants are applied to the window system. All window components (window glass, window regulator, window motor and glass top run) must be installed and tightened to specification before carrying out this procedure. Refer to the De-Initialization Procedure prior to performing the window motor initialization (unless a new motor is being installed).
NOTE: A new (or de-initialized) LF/RF (Navigator) or LF (Expedition) window motor will not operate in one-touch up or one-touch down mode until initialized. If a new LF/RF window motor has been installed, proceed to the Window Motor Initialization procedure in this section.
NOTE: Excessive bounce-back (window reverses direction with no obstructions present) may indicate that a de-initialization procedure may need to be performed.
De-Initialization Procedure
1.Start with the ignition key in the RUN position and open one front door.
2.NOTE: Steps 2 and 3 must be performed within 8 seconds.
Turn the ignition key from OFF to RUN 5 times.
3.Press the window control switch to the one-touch DOWN position (second detent) and release.
Window Motor Initialization
WARNING: Keep objects and body parts clear of the glass panel when carrying out the initialization procedure. During the initialization procedure, the glass panel closes with high force and cannot detect objects in its path. Failure to follow this instruction may result in serious personal injury.
4.Start with the ignition key in the OFF position and with the LF/RF door open.
5.Turn the ignition key to the ON position.
6.Activate and hold the window control switch in the one-touch DOWN position (second detent) until the window glass stalls for 2 seconds at the bottom of its travel and release the switch.
7.NOTE: After performing this step, wait a minimum of 3 seconds before operating the window control switch or ignition switch.
Activate and hold the window control switch (with no interuptions) in the one-touch UP position (second detent) until the window glass stalls for 2 seconds into the glass top run and release the switch.
8.Verify correct operation of the window by carrying out the one-touch up and one-touch down features. If the window does not operate correctly, carefully repeat this procedure.
Matt

#4
06-12-2013, 07:07 PM

#5
06-12-2013, 07:10 PM
#6
06-30-2013, 07:40 AM

Cross-Country
Join Date: May 2010
Location: Suburb of Chicago
Posts: 72
Likes: 0
Received 0 Likes
on
0 Posts
Before I rip things apart, my problem is that it seems that the window is binding on something. When I lower the window it is very slow and there is a screeching sound. When that happened I stopped lowering it about eight inches down. It goes up about two inches then freezes like it would when the window is all the way up. I was able to muscle it up with help, son was pushing the button and I had my hands, one inside one outside and help raise it so it is up and closed. Any ideas or help????? 2007 EL Limited
#7
08-04-2013, 06:42 AM
Cross-Country
Join Date: May 2010
Location: Suburb of Chicago
Posts: 72
Likes: 0
Received 0 Likes
on
0 Posts
To all readers, this how-to is fantastic. My 07 EL was slightly different. No need to lower window six inches, you can tape it to secure it in the full up position. The 07's have small cutouts so you can access the bolts that hold the actual glass. I was amazed how easy this was. I would not have tackled this if these instructions were not here. I am old school and remember special tools just to get the door panels off. Thanks for saving me a boat load of money.
Trending Topics
#8
12-08-2013, 08:47 PM

Thanks-
This thread gave me the courage to tackle this little job myself, and completed it sucessfully this afternoon. A couple of minor clarifications for the next person to build up their courage:
1- It is best to remove the speaker from the regulator before your remove the regulator bolts, since the wiring is next to impossible to get to from the regulator side, and must be disconnected to replace the regulator.
2- Even though the 07 has a cut out so that you can access the glass brackets in the full up position, I found the installation much easier with the brackets in the down (6-8 inches) position. When the brackets are in the full up position, it is easy to get to the bolts, but impossible to get your hand in there to loosen the bracket away from the glass.
3- Even though the new regulator was greased, I added some more lithium grease to be on the safe side.
4- I found it easier to swap out some of the bolt inserts from the old regulator.
5- Finally, the bolts that attach the regulator, pictured earlier in the thread, are metric, not imperial. That one took some head scratching before I figured out what I was doing wrong.
It took me about twice as long as indicated in the thread, but that included time to go get the new regulator, and cost me about $150 for the part. I have to say that the experience was painless, and was much easier than I expected.
#9
12-12-2013, 11:37 AM

window initialization
I would like to thank the original poster for an awesome write-up! I was able to follow the write-up to successfully replace my broken driver side window regulator. Let me tell you, it was not fun driving home from McDonald's in -30 degree weather with the window stuck down.
I also tried to follow the window initialization procedure but was only successful de-initializing it. Before that, the window would go to within 3in of the top and stop. Now, the auto feature doesn't work at all.
Have any of the other posters had success initializing their windows? Any tricks that made the procedure work? I could really use the help.
Thanks again,
Sean
#10
12-19-2013, 09:34 AM

Getting ready to tackle the Drivers Side Window
I hate to sound so dumb, but after reading this statement under "Window Motor Initialization":
"Press the window control switch to the one-touch DOWN position (second detent) and release."
Does this mean the first "Click" or pressing it all the way down and releasing it?
This is on the Drivers Side of a 2009 Expedition, if that makes any difference (which I think it does).
"Press the window control switch to the one-touch DOWN position (second detent) and release."
Does this mean the first "Click" or pressing it all the way down and releasing it?
This is on the Drivers Side of a 2009 Expedition, if that makes any difference (which I think it does).
#11
12-19-2013, 10:31 AM

Senior User
Join Date: Oct 2013
Location: Manitoba
Posts: 112
Likes: 0
Received 0 Likes
on
0 Posts
I just replaced the LF regulator on my 2007, but never bothered to do this de-initialize/initialize procedure. The window stayed in the full up position the whole time. express down works properly and stops in the right spot. Is it still possible it still needs to be initialized? I have not tried the obstacle detection. Is that the function that is gained from the process? Matt's procedure stated express down will not function only if window motor is replaced, so for everyone who does only the regulator and express function still works, why is it necessary?
#12
04-04-2014, 12:49 PM

Great original post
Excellent post, this allowed me to do the job on my 2010 Expedition. Driver window began making noises like a cat being slaughtered last summer and became really slow. Over the winter I needed my son and I to push up to close the window, then our first warm day came and I remembered I had forgotten all this. After dis-assembly following CStanley's post I saw the cable had become rusted and frayed. Ordered in the Window Reg for $200. A couple things that made it easier for me were:
1) take photos of panel off, weather shield off from various angles, it will help you remember where wires clip in.
2) Use masking tape, labeled, to show which connectors and screws belong in each position
3) When I re-assembled I found it easier to leave the door lever on the cable but not in the bracket until the door panel was returned into place. Then I gently repositioned the lever into its bracket.
4) Auto up not working yet, I will work on re-initial procedure this weekend.
#13
04-11-2014, 04:37 PM

#14
04-11-2014, 04:43 PM
de-initialize/initialize window
I just replaced the LF regulator on my 2007, but never bothered to do this de-initialize/initialize procedure. The window stayed in the full up position the whole time. express down works properly and stops in the right spot. Is it still possible it still needs to be initialized? I have not tried the obstacle detection. Is that the function that is gained from the process? Matt's procedure stated express down will not function only if window motor is replaced, so for everyone who does only the regulator and express function still works, why is it necessary?
#15
06-13-2014, 09:40 PM

I think I am going to try and do it myself on my new to me 2009 Expy Eddie Bauer. Question though, Mine only makes a horendous screeching noise going down and it stops about half way up. Is it my Regulator or is it the Window motor? I'm thinking its the regulator but hoping for a push in the right direction.
Thanks,
Tom
Thanks,
Tom