Axle Nut Torque- F350
#1
 07-26-2012, 02:04 PM

#2
07-26-2012, 03:40 PM

#3
07-26-2012, 04:33 PM
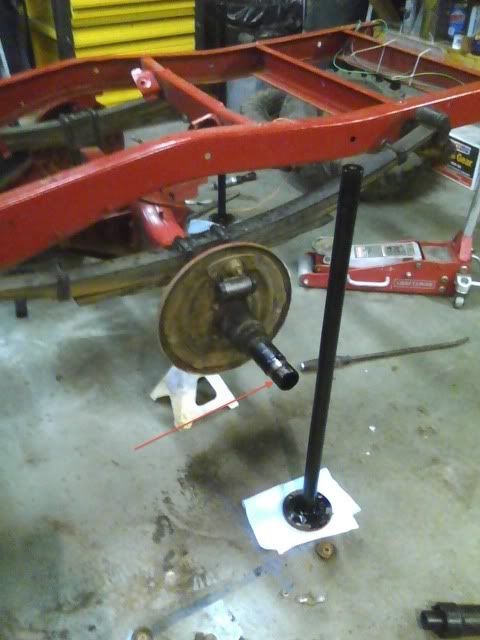
These are the nuts that hold the axleshaft and brake drum assembly on. I"ll check the size but I believe they're bigger than what you listed, I think the axle nut socket I used to take them off was like 2 1/4". There are 2 nuts on each side, you put the brake drum on, then one nut, then one of those tabbed lock washers then the second nut.

-Colin
-Colin
#4
07-26-2012, 04:53 PM

#5
07-26-2012, 05:10 PM
Single speed Rockwell/Timken axle(stock on '60 f350), dually rear wheels. I can go check the tag number if that will help. I described it as best I could in the last reply, it's the nuts that thread on where the arrow is pointing(sorry, the arrow's hard to see), I don't know what they're technically called, I always called them axle nuts. It's not the pinion nut.
Thanks
Thanks
#6
07-26-2012, 06:03 PM
OH! Ok I misunderstood. Thats what i call the bearing retaining or adjusting nut. I run it in while turning the hub to seat the bearing, loosen it, then snug it up again then back it off 45 degrees, peen the washer over at least two flats of the first nut then install the second/last nut and torque to 40 foot pounds.
Good luck in your quest
WHOA After I wrote this I went and checked the book! Rear axle lock nut torques to 100-150 foot pounds My bad, the 40 pounds is for the adjusting nut on my dana 44 front axle.
Sorry for passing on mis-information.
Good luck in your quest
WHOA After I wrote this I went and checked the book! Rear axle lock nut torques to 100-150 foot pounds My bad, the 40 pounds is for the adjusting nut on my dana 44 front axle.
Sorry for passing on mis-information.
#7
07-26-2012, 10:28 PM
I always did the rotating the drum thing until the bearing seats up and gets tight and then back off one notch of the tab and then bend up the tab on the flats. Drove the trucks for years, overloaded hauling scrap off the island etc, etc. 140 lb and leave it there? An old machinist friend told me once that chrysler products always specified a preload on a timken tapered roller bearing, but ford didn't. History seems to say that it works either way. How about 70 lbs, and we all win?
Trending Topics
#9
07-26-2012, 10:53 PM
[QUOTE]140 lb and leave it there?/QUOTE]
Gary I must be mixing my english and my hickaneese. The 100-140 lbs torque is on the jamb nut not the bearing adjusting nut. The first nut (adjusting nut) is like you said tightened to seat the bearing and then backed off(no preload) a notch (as you do) or 45 degrees or 1/8th of a turn. Then the jamb nut is torqued.
Sorry for any confusion.
#10
07-27-2012, 08:38 PM
Now that makes sense! Most of the time the jamb nut either has been installed and removed a few times with a cold chisel by some PO  . Then other times it's a smooth ring with a series of notches around the perimeter. Either way I can't imagine ever getting a torque wrench on one once the cold chisel has done it's work. So for me, I tighten the locknut to aproximately one large tap, and two smaller ones....
[quote=theodore/teddy;12103953]
. Then other times it's a smooth ring with a series of notches around the perimeter. Either way I can't imagine ever getting a torque wrench on one once the cold chisel has done it's work. So for me, I tighten the locknut to aproximately one large tap, and two smaller ones....[quote=theodore/teddy;12103953]
140 lb and leave it there?/QUOTE]
Gary I must be mixing my english and my hickaneese. The 100-140 lbs torque is on the jamb nut not the bearing adjusting nut. The first nut (adjusting nut) is like you said tightened to seat the bearing and then backed off(no preload) a notch (as you do) or 45 degrees or 1/8th of a turn. Then the jamb nut is torqued.
Sorry for any confusion.
#11
07-27-2012, 08:47 PM
I'm with you Gary. I was trying to be very accurate.
And for the real world torque values if I feel the chisel might have slipped a little I do two large taps and a couple little ones.
I can't imagine ever getting a torque wrench on one once the cold chisel has done it's work. So for me, I tighten the locknut to aproximately one large tap, and two smaller ones....
#12
07-27-2012, 09:19 PM

Post Fiend
Make sure and prelube those bearings because it might take a while for the rear axle lube to get out there. Because they actually run in oil, they have a pre-load, not like the packed bearings that run a little loose. Sorry I don't have a spec, I've done them by feel for so long. You should be ok with 30-40 ft/lbs and tighten it while you are spinning the hub.
#13
07-28-2012, 11:54 AM
When I was 16 I worked for an old guy setting moorings and hauling boats and general work around the harbor. One day we replaced the cylinder head on his work boat, 6 cyl inline something. He torqued the head to the sound of the bolts, I think it was EEEEK, eeek, eek. Ran it for another 12 years day in, day out........til he sold it.
#14
07-28-2012, 03:02 PM
Senior User
From my 1960 Ford Truck Shop Manual. All specs should be the same for the 1957 model:
17. Install the outer bearing cone and start the bearing adjust nut. Turn the adjuster nut until the bearing adjustment is approximately correct. Now tighten the adjust nut and at the same time rotate the wheel in both directions. This is done so that all bearing surfaces come into proper contact. With the bearing rollers firmly seated, back off the adjuster nut 3/8 of a turn, and then install the lock washer.
If the adjusting nut is equipped with a locking dowel, make sure that the dowel enters the lock washer hole which most closely aligns with the dowel.
If the lock washer is equipped with tabs, run the lock nut against the lock washer and bend a tab over the adjusting nut.
18. Torque the lock nut to 100-150 foot-pounds (Fig. 21). With the lock nut at proper torque, the wheel must still rotate freely and without perceptible end play. Bend a lock washer tab over the lock nut, if the washer is so equipped.
#15
07-28-2012, 09:41 PM
Lets go with that one. Inner nut against bearing the way we like, and the outer lock nut jambed good and hard to keep it that way. Bend a tab or two and it stays that way for 20 years or so, til we have to do the brakes again, or replace a seal. Perfect. Some of us will be 79 then.....Hope I'm still doing my own work on the '59. 

