
2011 F250 Center console / Jumpseat Swap - DONE!
#1
 06-02-2012, 07:05 PM

Join Date: Oct 2011
Location: Bel Air MD
Posts: 366
Likes: 0
Received 0 Likes
on
0 Posts
2011 F250 Center console / Jumpseat Swap - DONE!
So I found another member who was willing to trade their center console for my jump seat. Lucky for both of us we were only about 1.5 hours away from eachother. After many emails, texts, and phone calls we had a date set, and planned it all out. Used his brother in laws body shop to do the swap.
It turned out really well!
Thought I would post some photos, and give a little advice to those interested...
CONSOLE REMOVAL:
I was not there when he removed the console, so I do not know for sure, but I think there are 8 bolts that hold the console in.
2 under the cup holders (just pop up the cup holder trim)
2 on the sides, but below the cup holders, (behind cover plates)
2 on the sides next to the seat, (exposed)
2 in the rear bolting to the floor. (need to loosen seat bolts to get to them)
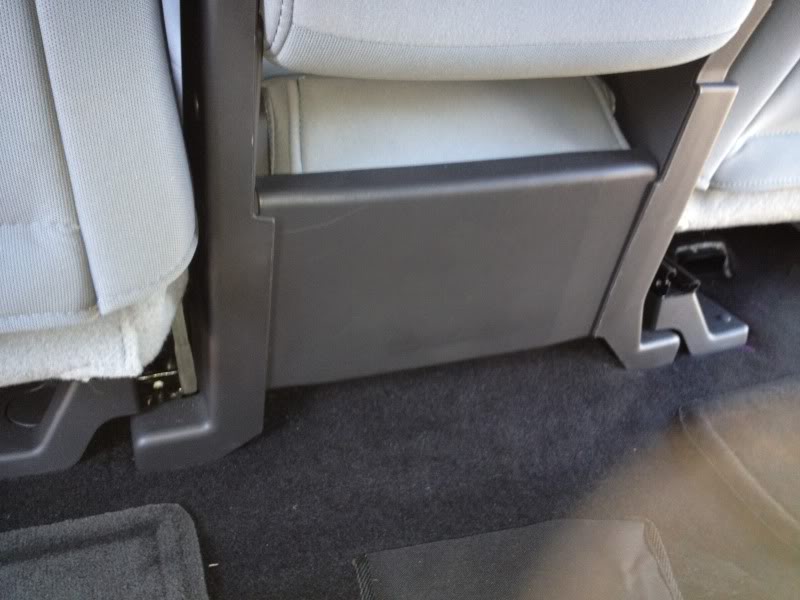
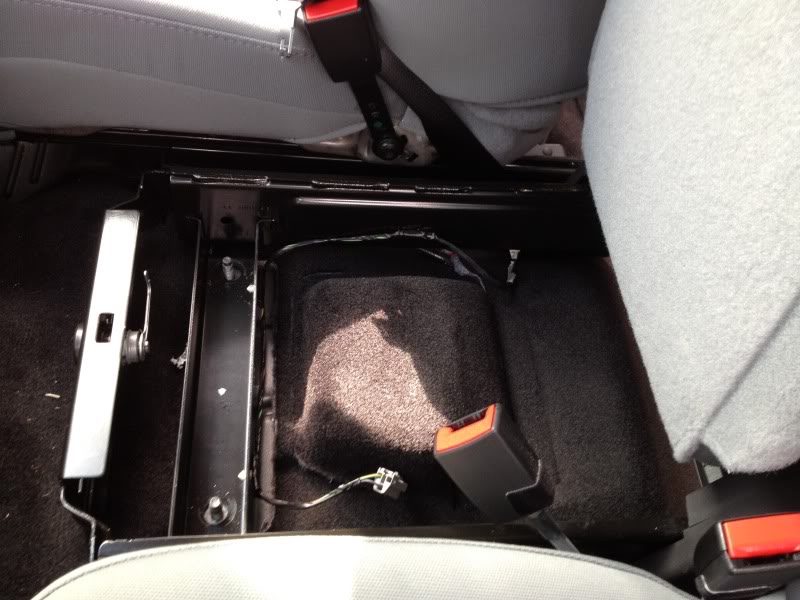
JUMP SEAT REMOVAL:
There are only 4 bolts that hold this in place.
2 at rear of seat, bolting to the floor (need to loosen seat bolts to get to them)
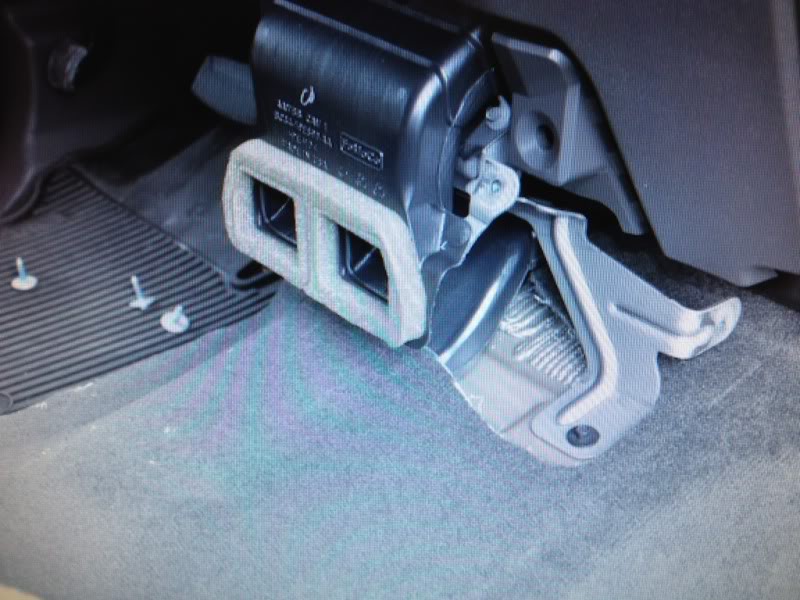
2 under the seat itself (need to remove 2 screws in front of seat, then pull tray out, be careful, and unplug the cigg lighter as your doing it, as there is not much slack)
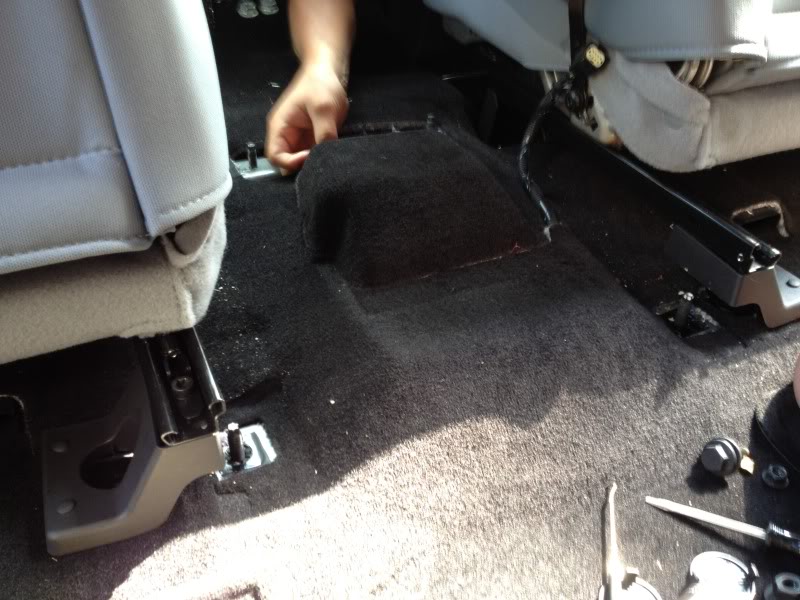
So basically, loosen the two front bolts on both the driver and passenger seats, then completely remove the two rear bolts on both seats. This allows you to tip the seats up but not have to remove them to get to the console and jump seat bolts. You can probably get to the bolts without doing this, but it makes it alot easier. Then remove the two screws holding the seat down. Both the seat belt strap, and receiver are attached to these bolts, so they come too.
Then open the seat, and remove the two screws on the front.
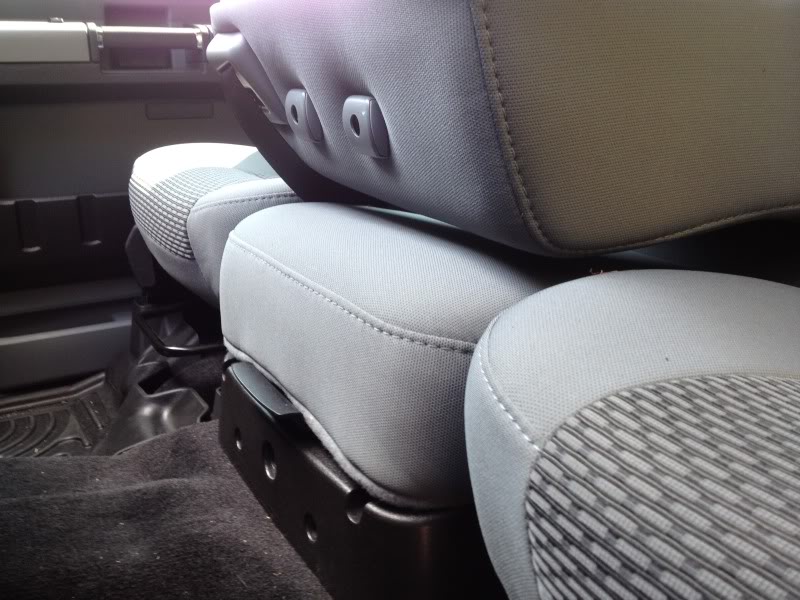
The tray should now pull out. Its a little snug, but once you lift it a bit, you need to squeeze your hand under and pop off the 12v plug, its tight, so dont pull too much out until its unplugged. Then pull the tray out, below are the other two screws that hold the seat down. pop them out and the seat should come right out. (there is a plug next to the passenger seat, unplug that as well, you will need it for the console, but leave the smaller plug that goes under the jumpseat)


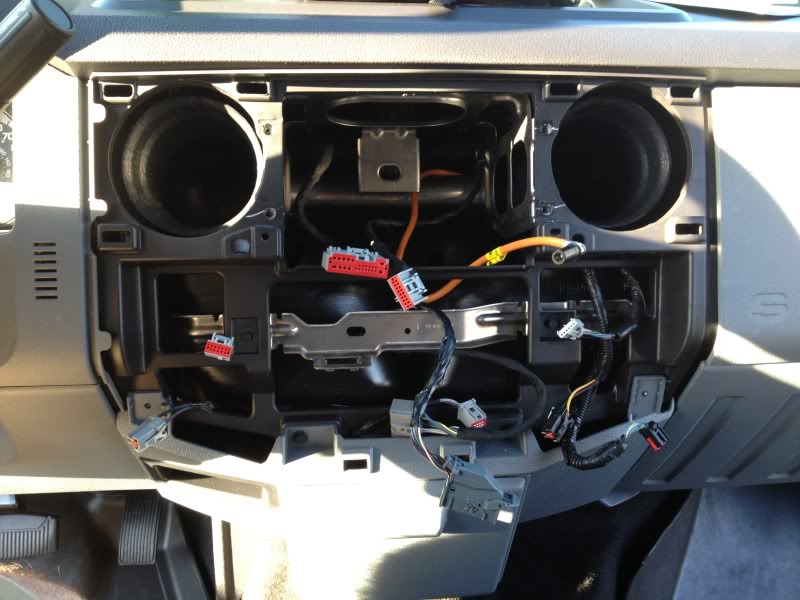
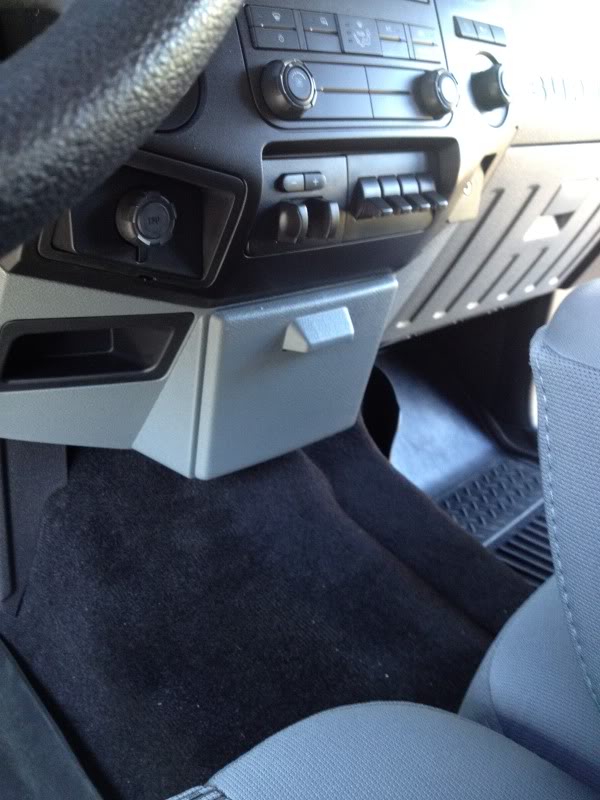
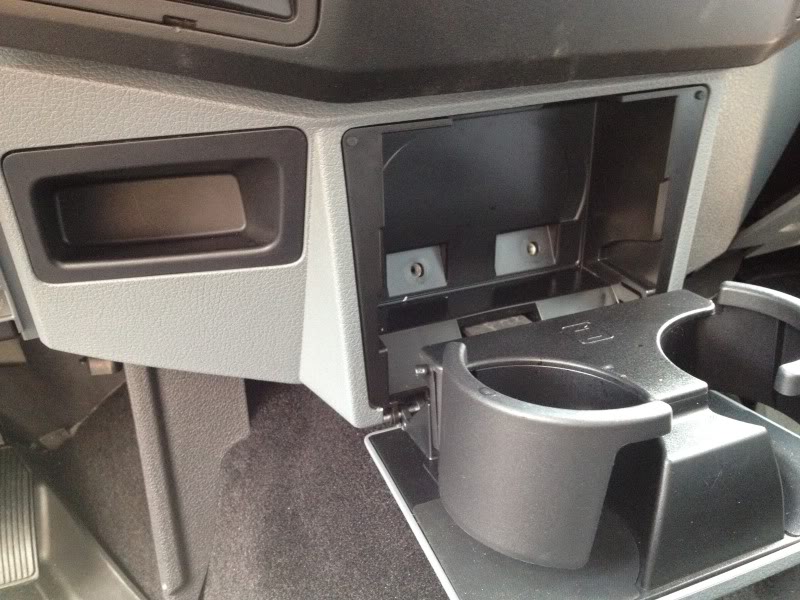
Now we have to pull the dash to get the fold down cupholder in.
Seems hard, pretty easy.
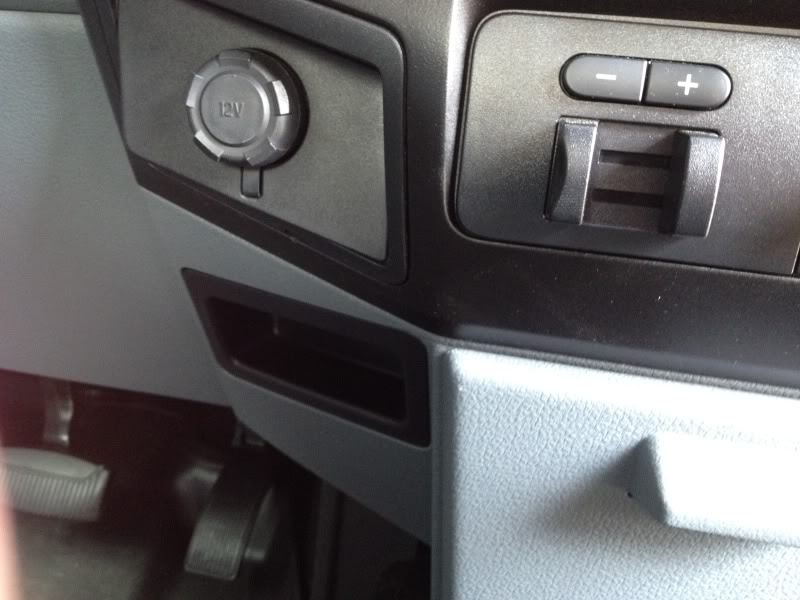
2 screws (torx) behind the cupholder,

then a few more on the panel itself. Start by pulling the 12v plate and 3.5 plug (and sync if you have it) out.

There are little tabs below each for a screw driver. They should pop out, behind each insert is a screw. Then pull the cover from below the steering wheel, there is a screw there as well. Now start pulling the center panel off, it is just push in inserts, so with an easy hand, it should pry off (i always went from the bottom up) You do not HAVE to remove the dash, simply pull it back a bit, but I found it easier to just pop it off, just a matter of pulling the plugs out.
Now its time to put the console in.
The only drawback I see on this side, is that the flow through air will not work when the console is in. I guess if you were reaally good at engineering you could make something happen, but I do not see how. The vents simply to not attach to the console parts unless you have the console. There is just no hole. I had hoped there would be just a cover over the vents and I would be able to pop it off and plug in the console, but not so. I would have had to cut into my vent tubing to make it work.
Now there are a few options. To make this work 100% like factory, you need to cut your carpet to attach the front bracket. See attached (stolen photo of another members)

I did not want to cut my carpet, so I opted not to install this support bracket. I am not sure if you NEEEEED it, but I do not see why. It is bolted down under the seats, and next to the seats, so its not going anywhere! Its solid. So I opted to leave it out. So under the jumpseat there were the two bolts that removed earlier, these are now used to put in the bracket for the console. Put that on. Then start to put the dash piece for the console on, this goes on the same way the old cupholder came off (minus the torx screws) Now its time to put the console in. It should just slide right in. Screw down on the sides next to the seat (into the bracket that you swapped under the jumpseat) and also the two bolts under the seat in the rear. Now you can put the seats together and tighten everything back up. Dont forget to re plug in the harness for the 12v in the console.
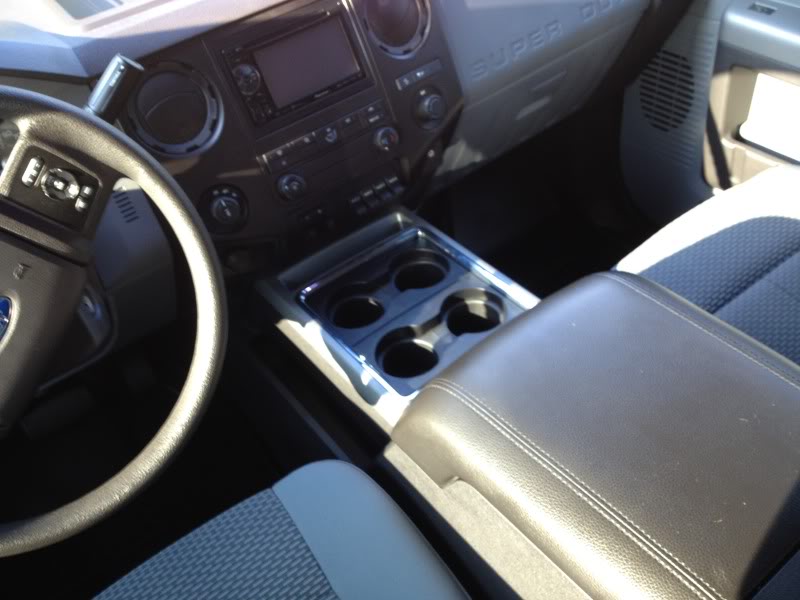
Your console is now done!
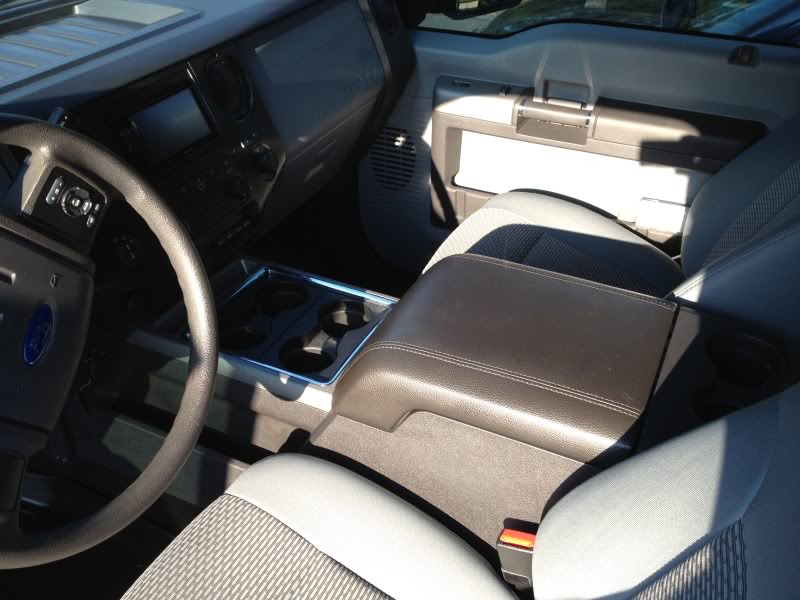
OLD:
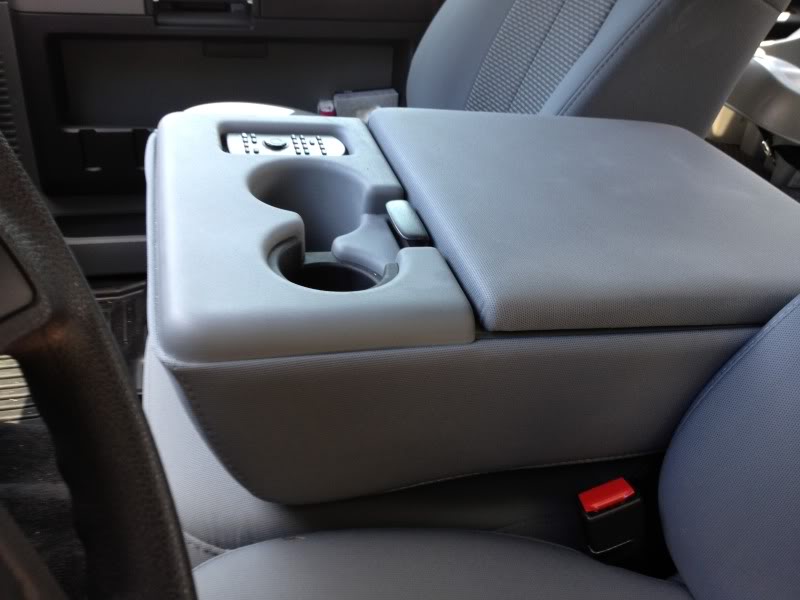
New:

Now the truck that is getting the jump seat is a little harder
You will still have the missing carpet under the cupholders. The guy who swapped is planning on getting the ford non-carpet kit, so it should not matter. Also, you will have to cap off the vents that came from the console. We just used ventilation tape and taped the plugs off. Then install and assemble the same way it came out of the other truck.. and your done!
Took us about 2 1/2 hours to do the full swap, minus the 15 min i took him to pull the console the day before.
Hope this helps someone!
THANKS Steve!!
It turned out really well!
Thought I would post some photos, and give a little advice to those interested...
CONSOLE REMOVAL:
I was not there when he removed the console, so I do not know for sure, but I think there are 8 bolts that hold the console in.
2 under the cup holders (just pop up the cup holder trim)
2 on the sides, but below the cup holders, (behind cover plates)
2 on the sides next to the seat, (exposed)
2 in the rear bolting to the floor. (need to loosen seat bolts to get to them)
JUMP SEAT REMOVAL:
There are only 4 bolts that hold this in place.
2 at rear of seat, bolting to the floor (need to loosen seat bolts to get to them)
2 under the seat itself (need to remove 2 screws in front of seat, then pull tray out, be careful, and unplug the cigg lighter as your doing it, as there is not much slack)
So basically, loosen the two front bolts on both the driver and passenger seats, then completely remove the two rear bolts on both seats. This allows you to tip the seats up but not have to remove them to get to the console and jump seat bolts. You can probably get to the bolts without doing this, but it makes it alot easier. Then remove the two screws holding the seat down. Both the seat belt strap, and receiver are attached to these bolts, so they come too.
Then open the seat, and remove the two screws on the front.
The tray should now pull out. Its a little snug, but once you lift it a bit, you need to squeeze your hand under and pop off the 12v plug, its tight, so dont pull too much out until its unplugged. Then pull the tray out, below are the other two screws that hold the seat down. pop them out and the seat should come right out. (there is a plug next to the passenger seat, unplug that as well, you will need it for the console, but leave the smaller plug that goes under the jumpseat)
Now we have to pull the dash to get the fold down cupholder in.
Seems hard, pretty easy.
2 screws (torx) behind the cupholder,
then a few more on the panel itself. Start by pulling the 12v plate and 3.5 plug (and sync if you have it) out.
There are little tabs below each for a screw driver. They should pop out, behind each insert is a screw. Then pull the cover from below the steering wheel, there is a screw there as well. Now start pulling the center panel off, it is just push in inserts, so with an easy hand, it should pry off (i always went from the bottom up) You do not HAVE to remove the dash, simply pull it back a bit, but I found it easier to just pop it off, just a matter of pulling the plugs out.
Now its time to put the console in.
The only drawback I see on this side, is that the flow through air will not work when the console is in. I guess if you were reaally good at engineering you could make something happen, but I do not see how. The vents simply to not attach to the console parts unless you have the console. There is just no hole. I had hoped there would be just a cover over the vents and I would be able to pop it off and plug in the console, but not so. I would have had to cut into my vent tubing to make it work.
Now there are a few options. To make this work 100% like factory, you need to cut your carpet to attach the front bracket. See attached (stolen photo of another members)
I did not want to cut my carpet, so I opted not to install this support bracket. I am not sure if you NEEEEED it, but I do not see why. It is bolted down under the seats, and next to the seats, so its not going anywhere! Its solid. So I opted to leave it out. So under the jumpseat there were the two bolts that removed earlier, these are now used to put in the bracket for the console. Put that on. Then start to put the dash piece for the console on, this goes on the same way the old cupholder came off (minus the torx screws) Now its time to put the console in. It should just slide right in. Screw down on the sides next to the seat (into the bracket that you swapped under the jumpseat) and also the two bolts under the seat in the rear. Now you can put the seats together and tighten everything back up. Dont forget to re plug in the harness for the 12v in the console.
Your console is now done!
OLD:
New:
Now the truck that is getting the jump seat is a little harder
You will still have the missing carpet under the cupholders. The guy who swapped is planning on getting the ford non-carpet kit, so it should not matter. Also, you will have to cap off the vents that came from the console. We just used ventilation tape and taped the plugs off. Then install and assemble the same way it came out of the other truck.. and your done!
Took us about 2 1/2 hours to do the full swap, minus the 15 min i took him to pull the console the day before.
Hope this helps someone!
THANKS Steve!!
#2
02-14-2013, 10:32 AM

New User
Join Date: Jun 2002
Location: Indianapolis USA
Posts: 21
Likes: 0
Received 0 Likes
on
0 Posts

#4
09-06-2013, 06:39 AM

Flow Through Ventalation in Console swap
Just starting this change and was wondering if anyone has tried to buy the change parts from Ford to adapt the flow through ventilation. Can they be changed out without totaling removing the dash? Also does the console plug just simply plug in? Thanks
#5
09-06-2013, 12:17 PM
Junior User
Join Date: Aug 2013
Location: Western edge of Arkansas
Posts: 85
Likes: 0
Received 0 Likes
on
0 Posts
#6
11-07-2013, 06:15 PM

Junior User
Join Date: Jun 2013
Location: Wautoma WI
Posts: 90
Likes: 0
Received 0 Likes
on
0 Posts
#7
03-27-2014, 08:40 PM

Trending Topics
#8
09-08-2014, 09:10 AM

Hi Everyone-
I'm in the process of getting ready to swap my jump seat for my recently acquired flow through center console in my 2014 XL-350 CC 4x4. I believe I need to change the lower dash panel to the panel that accepts the center console? Does anyone have a Ford part number for this lower panel? My interior is the gray/black combo. Are there any other parts that I need? What about the front mount bracket and the middle mount bracket? I have read that these brackets may not be needed? Two more questions.......is the XL350 wiring hardness connector already under the jump seat/vinyl floor to connect the inverter? I know the center console is offered as an option for the XLT but not the XL so I am wondering if the hardness is the same, kind of like a plug and play for all models?
Thanks in advance for all the help!-
RRRAVEN

#10
10-12-2014, 02:30 PM

Anyone wanna swap black leather jump seat for a console
Any one wanna swap black keather jump seat fir center console UOTE=SlickYamaha;11907631]So I found another member who was willing to trade their center console for my jump seat. Lucky for both of us we were only about 1.5 hours away from eachother. After many emails, texts, and phone calls we had a date set, and planned it all out. Used his brother in laws body shop to do the swap.
It turned out really well!
Thought I would post some photos, and give a little advice to those interested...
CONSOLE REMOVAL:
I was not there when he removed the console, so I do not know for sure, but I think there are 8 bolts that hold the console in.
2 under the cup holders (just pop up the cup holder trim)
2 on the sides, but below the cup holders, (behind cover plates)
2 on the sides next to the seat, (exposed)
2 in the rear bolting to the floor. (need to loosen seat bolts to get to them)
JUMP SEAT REMOVAL:
There are only 4 bolts that hold this in place.
2 at rear of seat, bolting to the floor (need to loosen seat bolts to get to them)
2 under the seat itself (need to remove 2 screws in front of seat, then pull tray out, be careful, and unplug the cigg lighter as your doing it, as there is not much slack)
So basically, loosen the two front bolts on both the driver and passenger seats, then completely remove the two rear bolts on both seats. This allows you to tip the seats up but not have to remove them to get to the console and jump seat bolts. You can probably get to the bolts without doing this, but it makes it alot easier. Then remove the two screws holding the seat down. Both the seat belt strap, and receiver are attached to these bolts, so they come too.

Then open the seat, and remove the two screws on the front.

The tray should now pull out. Its a little snug, but once you lift it a bit, you need to squeeze your hand under and pop off the 12v plug, its tight, so dont pull too much out until its unplugged. Then pull the tray out, below are the other two screws that hold the seat down. pop them out and the seat should come right out. (there is a plug next to the passenger seat, unplug that as well, you will need it for the console, but leave the smaller plug that goes under the jumpseat)
Now we have to pull the dash to get the fold down cupholder in.
Seems hard, pretty easy.
2 screws (torx) behind the cupholder,
then a few more on the panel itself. Start by pulling the 12v plate and 3.5 plug (and sync if you have it) out.
There are little tabs below each for a screw driver. They should pop out, behind each insert is a screw. Then pull the cover from below the steering wheel, there is a screw there as well. Now start pulling the center panel off, it is just push in inserts, so with an easy hand, it should pry off (i always went from the bottom up) You do not HAVE to remove the dash, simply pull it back a bit, but I found it easier to just pop it off, just a matter of pulling the plugs out.

Now its time to put the console in.
The only drawback I see on this side, is that the flow through air will not work when the console is in. I guess if you were reaally good at engineering you could make something happen, but I do not see how. The vents simply to not attach to the console parts unless you have the console. There is just no hole. I had hoped there would be just a cover over the vents and I would be able to pop it off and plug in the console, but not so. I would have had to cut into my vent tubing to make it work.
Now there are a few options. To make this work 100% like factory, you need to cut your carpet to attach the front bracket. See attached (stolen photo of another members)
I did not want to cut my carpet, so I opted not to install this support bracket. I am not sure if you NEEEEED it, but I do not see why. It is bolted down under the seats, and next to the seats, so its not going anywhere! Its solid. So I opted to leave it out. So under the jumpseat there were the two bolts that removed earlier, these are now used to put in the bracket for the console. Put that on. Then start to put the dash piece for the console on, this goes on the same way the old cupholder came off (minus the torx screws) Now its time to put the console in. It should just slide right in. Screw down on the sides next to the seat (into the bracket that you swapped under the jumpseat) and also the two bolts under the seat in the rear. Now you can put the seats together and tighten everything back up. Dont forget to re plug in the harness for the 12v in the console.
Your console is now done!
OLD:


New:

Now the truck that is getting the jump seat is a little harder
You will still have the missing carpet under the cupholders. The guy who swapped is planning on getting the ford non-carpet kit, so it should not matter. Also, you will have to cap off the vents that came from the console. We just used ventilation tape and taped the plugs off. Then install and assemble the same way it came out of the other truck.. and your done!
Took us about 2 1/2 hours to do the full swap, minus the 15 min i took him to pull the console the day before.
Hope this helps someone!
THANKS Steve!![/QUOTE]
It turned out really well!
Thought I would post some photos, and give a little advice to those interested...
CONSOLE REMOVAL:
I was not there when he removed the console, so I do not know for sure, but I think there are 8 bolts that hold the console in.
2 under the cup holders (just pop up the cup holder trim)
2 on the sides, but below the cup holders, (behind cover plates)
2 on the sides next to the seat, (exposed)
2 in the rear bolting to the floor. (need to loosen seat bolts to get to them)
JUMP SEAT REMOVAL:
There are only 4 bolts that hold this in place.
2 at rear of seat, bolting to the floor (need to loosen seat bolts to get to them)
2 under the seat itself (need to remove 2 screws in front of seat, then pull tray out, be careful, and unplug the cigg lighter as your doing it, as there is not much slack)
So basically, loosen the two front bolts on both the driver and passenger seats, then completely remove the two rear bolts on both seats. This allows you to tip the seats up but not have to remove them to get to the console and jump seat bolts. You can probably get to the bolts without doing this, but it makes it alot easier. Then remove the two screws holding the seat down. Both the seat belt strap, and receiver are attached to these bolts, so they come too.
Then open the seat, and remove the two screws on the front.
The tray should now pull out. Its a little snug, but once you lift it a bit, you need to squeeze your hand under and pop off the 12v plug, its tight, so dont pull too much out until its unplugged. Then pull the tray out, below are the other two screws that hold the seat down. pop them out and the seat should come right out. (there is a plug next to the passenger seat, unplug that as well, you will need it for the console, but leave the smaller plug that goes under the jumpseat)
Now we have to pull the dash to get the fold down cupholder in.
Seems hard, pretty easy.
2 screws (torx) behind the cupholder,
then a few more on the panel itself. Start by pulling the 12v plate and 3.5 plug (and sync if you have it) out.
There are little tabs below each for a screw driver. They should pop out, behind each insert is a screw. Then pull the cover from below the steering wheel, there is a screw there as well. Now start pulling the center panel off, it is just push in inserts, so with an easy hand, it should pry off (i always went from the bottom up) You do not HAVE to remove the dash, simply pull it back a bit, but I found it easier to just pop it off, just a matter of pulling the plugs out.
Now its time to put the console in.
The only drawback I see on this side, is that the flow through air will not work when the console is in. I guess if you were reaally good at engineering you could make something happen, but I do not see how. The vents simply to not attach to the console parts unless you have the console. There is just no hole. I had hoped there would be just a cover over the vents and I would be able to pop it off and plug in the console, but not so. I would have had to cut into my vent tubing to make it work.
Now there are a few options. To make this work 100% like factory, you need to cut your carpet to attach the front bracket. See attached (stolen photo of another members)
I did not want to cut my carpet, so I opted not to install this support bracket. I am not sure if you NEEEEED it, but I do not see why. It is bolted down under the seats, and next to the seats, so its not going anywhere! Its solid. So I opted to leave it out. So under the jumpseat there were the two bolts that removed earlier, these are now used to put in the bracket for the console. Put that on. Then start to put the dash piece for the console on, this goes on the same way the old cupholder came off (minus the torx screws) Now its time to put the console in. It should just slide right in. Screw down on the sides next to the seat (into the bracket that you swapped under the jumpseat) and also the two bolts under the seat in the rear. Now you can put the seats together and tighten everything back up. Dont forget to re plug in the harness for the 12v in the console.
Your console is now done!
OLD:
New:
Now the truck that is getting the jump seat is a little harder
You will still have the missing carpet under the cupholders. The guy who swapped is planning on getting the ford non-carpet kit, so it should not matter. Also, you will have to cap off the vents that came from the console. We just used ventilation tape and taped the plugs off. Then install and assemble the same way it came out of the other truck.. and your done!
Took us about 2 1/2 hours to do the full swap, minus the 15 min i took him to pull the console the day before.
Hope this helps someone!
THANKS Steve!![/QUOTE]
#11
09-26-2016, 12:25 PM
Senior User
I took out the console in my 2011 and installed the jump seat.
I bought a cup holder but it doesn't fit. I'm guessing I need a different lower dash piece. Any idea what part I need?
Also, what's the best way to cover up the hole in the carpet where the bracket was at? I want to cover the holes and the vent going to under the seats.
TIA.
I bought a cup holder but it doesn't fit. I'm guessing I need a different lower dash piece. Any idea what part I need?
Also, what's the best way to cover up the hole in the carpet where the bracket was at? I want to cover the holes and the vent going to under the seats.
TIA.
#12
10-28-2016, 10:31 PM


#15
09-18-2017, 09:12 AM
