
Dash Bezel silver trim how to
#16
 09-04-2011, 05:33 PM

Posting Guru
I did this around a year ago, but couldn't find a paint pen, and so went with one of those little jars of hobby paint, and a cue-tip. It worked, but it wasn't perfect, this looks GREAT!
But hey, don't hate on Michael's! I've gone there more times as a last resort to find that one weird thing I can't find anywhere else, with generally great results! Thick sheets of cork for custom gaskets, this paint and others, plastic glues and fillers. And tell em you teach kindergarten and they give you a discount! Haha, but no joke! Sure it's no home depot, not a place you go to hang out on a rainy day, but it's come through for me before!
Anyway though, nice work again, and these markers, or the little hobby paints are a great way to really add some snap to your interior. I've used chrome, copper, black, and mixed some to make a green I like.
AleX
#17
09-04-2011, 05:45 PM
Senior User
Join Date: Aug 2010
Location: Residing in the shwa. On.
Posts: 334
Likes: 0
Received 0 Likes
on
0 Posts
I did mine with the same paint pen a lil while ago, but I don't know if it was my pen or the bezel but I should have did it backwards. The paint dries fast, I found that running the small lines "inset the bezel" kind of damaged the tip so I couldn't get a real smooth line on the wider lip. But all in all the closest product to use, turned out way better than I anticipated.
Nice work on yours!!
Nice work on yours!!
#18
09-04-2011, 05:50 PM

That's a great idea! I was just thinking that I was going to have to replace ALL of my dash trim to match a new dash bezel. (Old one is cracked.) Now I know I can fix the original Lariat trim!
I have a wife and FOUR daughters. By now I'm almost numb going to Michaels.
Thanks for the valuable tip and photos (I just love photos!) co425!
tip: to save embarrassment at "Michaels", just take the wife and go in like you are doing so under extreme protest ... works ever time 
Thanks for the valuable tip and photos (I just love photos!) co425!
#20
09-05-2011, 04:09 PM
#21
09-05-2011, 05:39 PM

#22
09-06-2011, 10:02 AM

Senior User
Join Date: Sep 2011
Location: n. Fla
Posts: 117
Likes: 0
Received 0 Likes
on
0 Posts

#23
09-06-2011, 02:15 PM
Posting Guru
White, yes I've done it, and there's actually a kind of tricky, but GREAT (once the work is done) way to do it.
I got a Sony radio/cd/Ipod unit for around 100$, and it was basically the same size as a stock unit, but around twice as deep (front to back). This obviously meant I had to do something about the metal mounts that hold the heater control unit, and the old radio, since they sit facing front, flush with the back of the old unit (meaning the new unit only fits about halfway in). What I did, is just cut them off at their bases, bend them back at 90* so they now sit flush with the TOP of the new radio box, and I drilled one hole in each metal face, and tack welded 2 bolts to the top of the radio box (just the metal shell, do NOT weld with radio nearby!), fit those bolts through the holes in the bent metal pieces, couple nuts, and it works GREAT! You could just as easily use zip ties or something to hold it in, if you don't wanna weld.
Lemme know if you don't get any of that..... AleX
#25
09-06-2011, 06:19 PM
#26
09-06-2011, 06:33 PM
Join Date: Oct 2010
Location: Northern and Southern Cal
Posts: 4,656
Likes: 0
Received 0 Likes
on
0 Posts
#28
09-07-2011, 06:47 AM
#30
09-08-2011, 12:12 AM
White, yes I've done it, and there's actually a kind of tricky, but GREAT (once the work is done) way to do it.
I got a Sony radio/cd/Ipod unit for around 100$, and it was basically the same size as a stock unit, but around twice as deep (front to back). This obviously meant I had to do something about the metal mounts that hold the heater control unit, and the old radio, since they sit facing front, flush with the back of the old unit (meaning the new unit only fits about halfway in). What I did, is just cut them off at their bases, bend them back at 90* so they now sit flush with the TOP of the new radio box, and I drilled one hole in each metal face, and tack welded 2 bolts to the top of the radio box (just the metal shell, do NOT weld with radio nearby!), fit those bolts through the holes in the bent metal pieces, couple nuts, and it works GREAT! You could just as easily use zip ties or something to hold it in, if you don't wanna weld.
Lemme know if you don't get any of that..... AleX
I got a Sony radio/cd/Ipod unit for around 100$, and it was basically the same size as a stock unit, but around twice as deep (front to back). This obviously meant I had to do something about the metal mounts that hold the heater control unit, and the old radio, since they sit facing front, flush with the back of the old unit (meaning the new unit only fits about halfway in). What I did, is just cut them off at their bases, bend them back at 90* so they now sit flush with the TOP of the new radio box, and I drilled one hole in each metal face, and tack welded 2 bolts to the top of the radio box (just the metal shell, do NOT weld with radio nearby!), fit those bolts through the holes in the bent metal pieces, couple nuts, and it works GREAT! You could just as easily use zip ties or something to hold it in, if you don't wanna weld.
Lemme know if you don't get any of that..... AleX

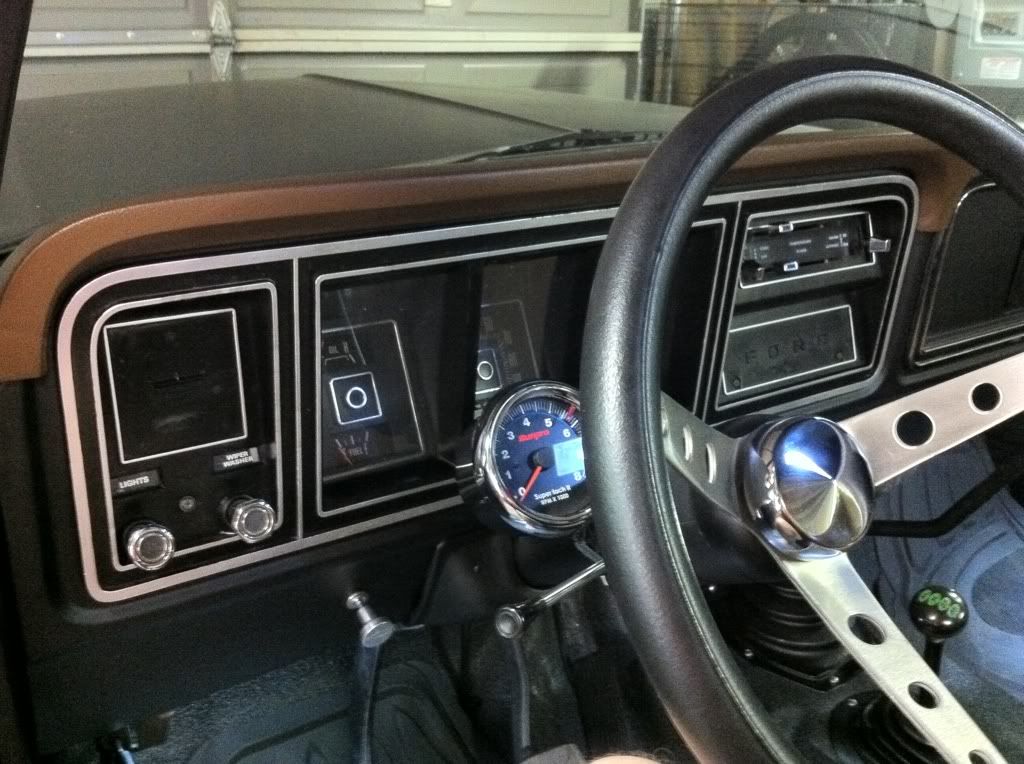
also, can someone tell me what the blue wire with red stripe is for? you can see it cut and stripped in the picture.