

 11-17-2014, 05:21 PM
Last edit by: IB Advertising
See related guides and technical advice from our community experts:
Browse all: Interior Guides
- How to Install Rearview Backup Camera
Step by step instructions for do-it-yourself repairs
Browse all: Interior Guides

Add backup camera to 2011 F-150 XLT ?
#1
06-27-2011, 02:53 PM


Add backup camera to 2011 F-150 XLT ?
Greetings,
I recently bought a new 2011 XLT. I had to get a loaner for a day while I had a few things added. The loaner had the factory backup cam. Now, I wish I had bought that option! The dealer says its NOT something they can add. They could only add an aftermarket. I have seen on the forums that folks are adding the factory camera themselves, but I have not seen anyone describing doing that on the 2011.
From the factory, I have the sync system and autodim mirror + compass function (compass displays in dash). I have unplugged my mirror and verified that this disables the compass display, but does not affect the sync mic. The mic appears to be installed in the head liner just left of the map lights.
The main questions that I have are:
Does the existing wiring harness for my mirror have the needed connections for the mirror with monitor?
Can I just buy the needed mirror/monitor+compass and plug it in to my existing harness without having to run any wires above the head liner?
Thank you.

#4
08-15-2011, 08:59 PM
Progress
I Received the RVD/Compass rear view mirror and emblem camera for my 2011 XLT. Everything I read pointed to me having to replace the headliner harness and the body harness. Well That was not the case. The headliner was already pre-wired and had the 16 pin plug and so was the body harness the only harness that I had to replace was the taillight harness. 
#5
08-16-2011, 05:36 AM
I have a Garmin Nuvi 5000 that is back-up camera capable. A back-up camera has 2 wires. One gets wired to the backup lights for power. The other wire must be ran to the front and plugged into my Garmin Nuvi 5000. I haven't actually done this installation yet but it appears to be a fairly straight forward install.
This is the camera I think I will use.
This is the camera I think I will use.
#6
08-16-2011, 08:17 PM
Freshman User
Join Date: Jan 2008
Location: SouthEastern Pennsylvania
Posts: 33
Likes: 0
Received 0 Likes
on
0 Posts
Trending Topics
#8
08-17-2011, 06:59 PM
Freshman User
Join Date: Jan 2008
Location: SouthEastern Pennsylvania
Posts: 33
Likes: 0
Received 0 Likes
on
0 Posts
#9
08-21-2011, 04:43 PM
I bought the RVD/Compass mirror and backup cam from nailsandsales on ebay. She didnt have the product listed for sale on ebay so I emailed her and asked. Sure enough she invoiced me on paypal and shipped the products. I then called Tasca Ford in RI to find out which harnesses I would need to complete the install. They told me just the taillight harness. I attempted to do the install this weekend and found out that the body harness will also need to be replaced. I am not sure about the headliner yet. After installing the RVD mirror and the cam I just got a blue screen when shifting into reverse. I began troubleshooting for no video signal and what I found was where the taillight harness meets the body harness the camera wires were missing from the body harness. It doesn't look hard to install but now I have to order it and wait another week to get it. I will report back after I install and let you all know if it worked without doing the headliner harness.
#10
08-23-2011, 04:04 AM

you do realize the extent of the camera harness right?
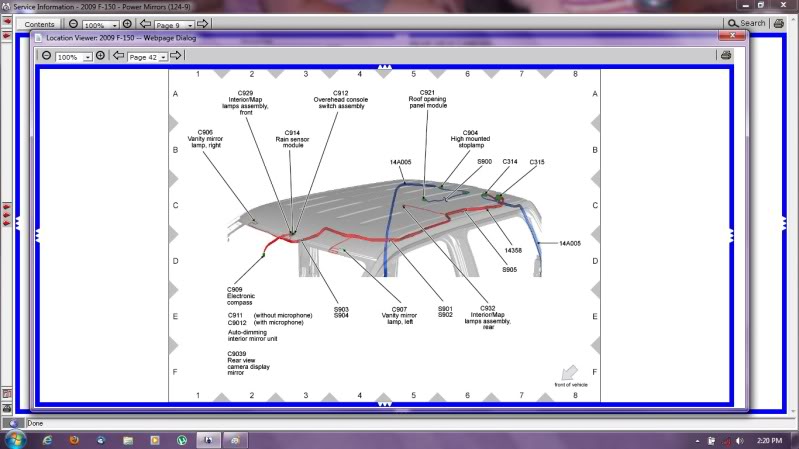
it runs from the tailgate, up the left side of the frame, into the engine bay, loops near the drivers headlight, cuts a u-turn and then goes back to the cabin. near the e-brake, it splits and then goes back down the drivers side floorboard. at the rear of the cab, the harness goes up and then comes fwd to the rearview mirror.
I am installing a 2009 F-150 tailgate emblem camera (got from Nailsandsails also btw) with a 2010 F-150 rearview mirror into my 2006 F-250. The camera came with the tailgate/tail-light harness. I was going to purchase the harness like you were, but once I started digging through my Ford Repair DVD, I realized how pointless that would be.
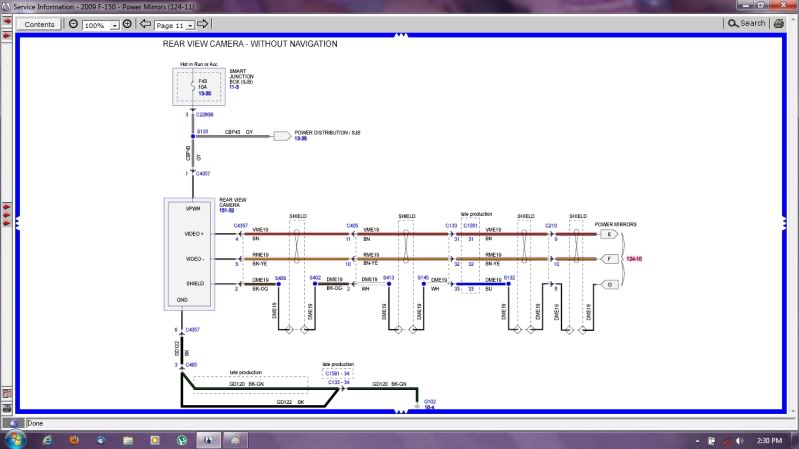
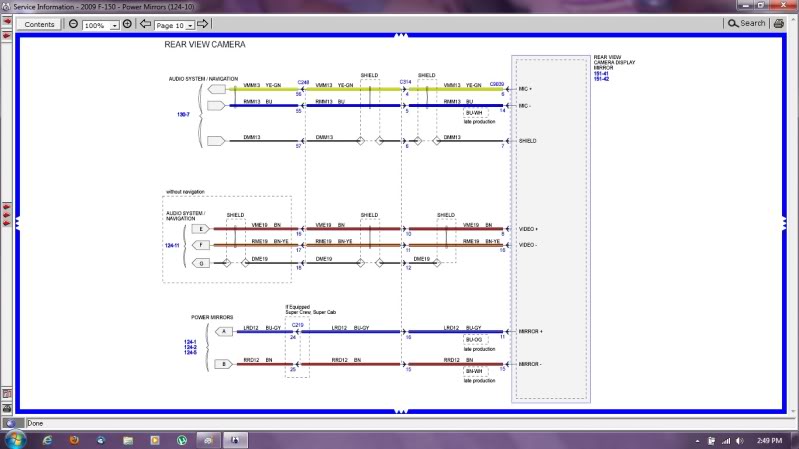
The + and - are wrapped by the shield wire and go into the cab using that route I mentioned above. At the mirror the shield terminates (not connected) and the +/- feed in. There is a reverse trigger wire that your truck already has. Below is a pin-out showing the Camera and mirror power schematic for a 2009. Should be identical for your 2011
btw, when you have the backup camera, and the Sync system, the Mic gets added to the mirror. Not sure how that will work with your truck having the mic in the visor

it runs from the tailgate, up the left side of the frame, into the engine bay, loops near the drivers headlight, cuts a u-turn and then goes back to the cabin. near the e-brake, it splits and then goes back down the drivers side floorboard. at the rear of the cab, the harness goes up and then comes fwd to the rearview mirror.
I am installing a 2009 F-150 tailgate emblem camera (got from Nailsandsails also btw) with a 2010 F-150 rearview mirror into my 2006 F-250. The camera came with the tailgate/tail-light harness. I was going to purchase the harness like you were, but once I started digging through my Ford Repair DVD, I realized how pointless that would be.
my solution was to grab 2 Monster brand RCA cables I had laying around that were 10' long. I cut the ends off, soldered them together and now I have 20' of camera cable. Plan is to route everything tomorrow. Hopefully it all works first time
it will work exactly like a OEM setup because the reverse trigger wire is fed to the rearview mirror. no need for relays or any other special wiring. I love it when Ford makes something easy
The camera has 5 wires going to it. 1 hot (when key on), 1 ground, a + signal, a - signal, and a shield wire.it will work exactly like a OEM setup because the reverse trigger wire is fed to the rearview mirror. no need for relays or any other special wiring. I love it when Ford makes something easy
The + and - are wrapped by the shield wire and go into the cab using that route I mentioned above. At the mirror the shield terminates (not connected) and the +/- feed in. There is a reverse trigger wire that your truck already has. Below is a pin-out showing the Camera and mirror power schematic for a 2009. Should be identical for your 2011
btw, when you have the backup camera, and the Sync system, the Mic gets added to the mirror. Not sure how that will work with your truck having the mic in the visor
#11
08-23-2011, 07:54 AM
2011 XLT OEM Backup Cam
Nice pics, wish I had the same for my 2011. It seems like the wire color is different from 2010 to 2011. Called Tasca ford to order the body harness and they informed me that there is no other harness for my truck and the wires should be there. The cam wires clearly do not continue into the body harness so they ordered a new one to see if it was an error in product of the harness on my truck. The Camera wires for my 2011 are Green/White,Brown/Violet,Violet,Grey/Violet,Black/Green. They also told me I would not need the headliner harness since my truck already has the 16 pin connector and the only other option would be an 8 pin so we will see. I am trying to do this as close to factory as possible with this being a new truck that still has a warranty.
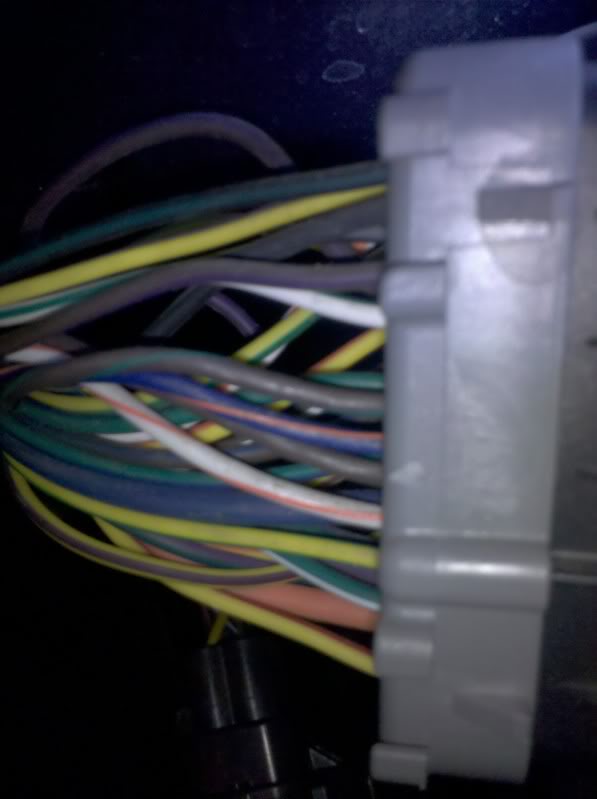
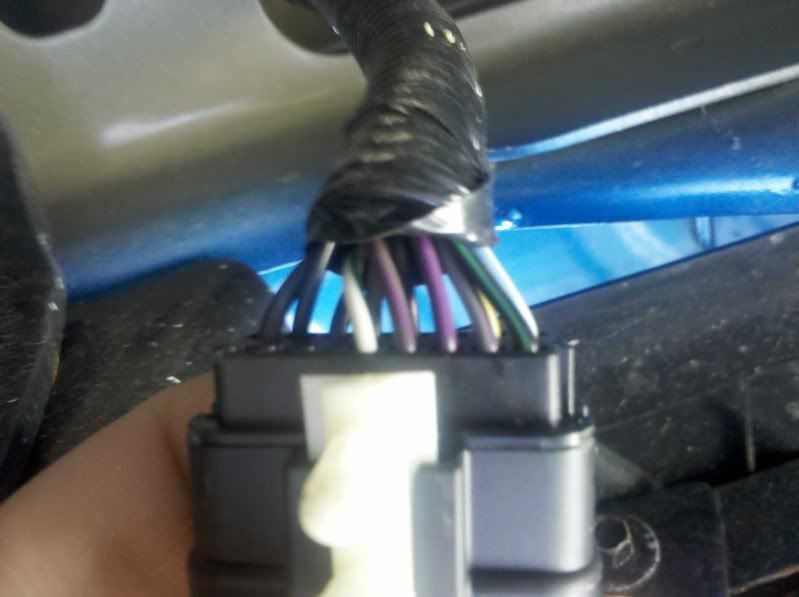
New Taillight harness, I believe the bottom 5 wires are the camera.

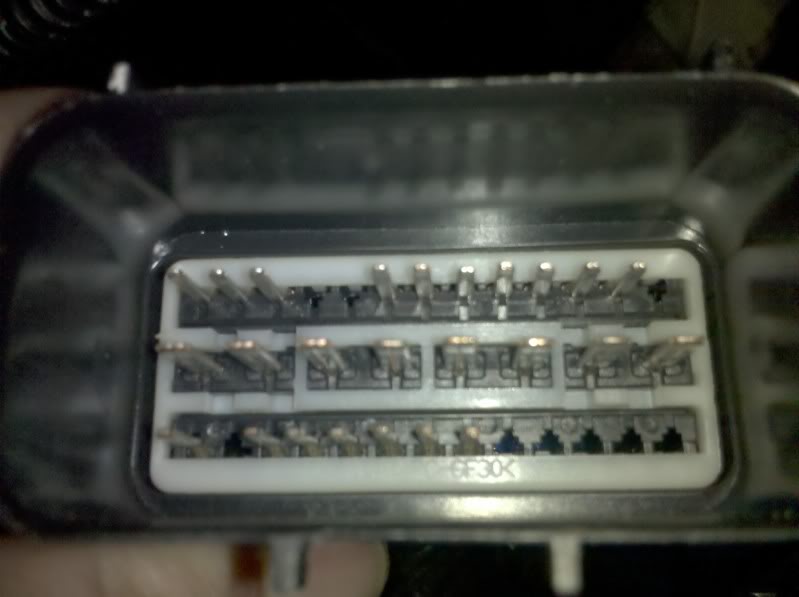
Truck body harness. Clearly those same 5 wires do not exist on the body harness side.
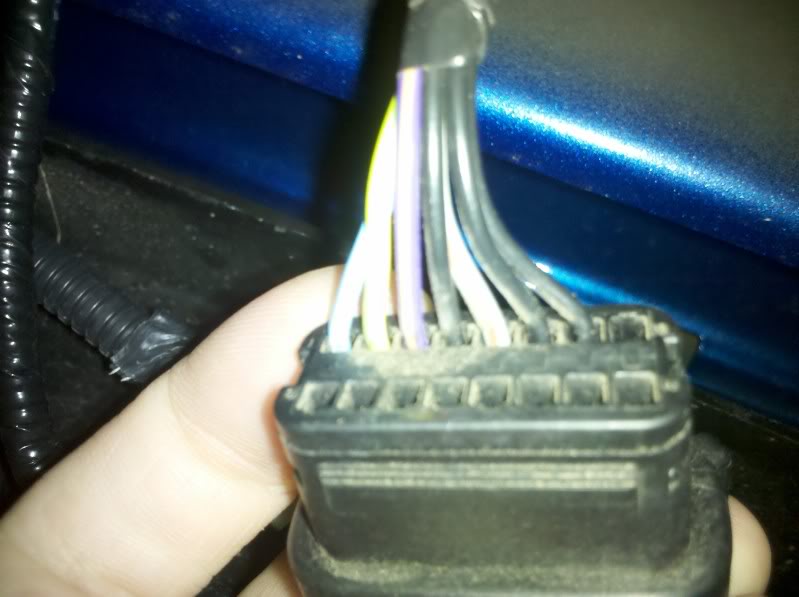
Fuse box side of the body harness. Notice the top 5 wires.
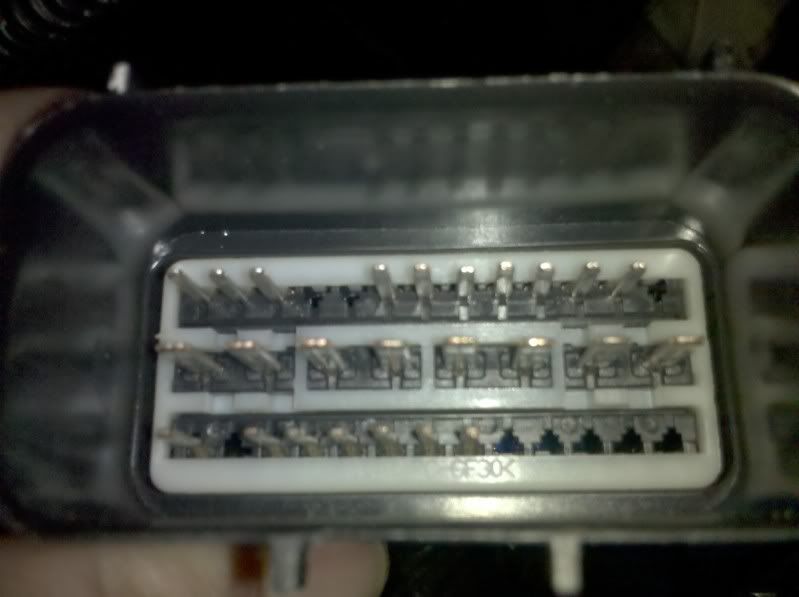
Engine compartment end of the body harness. Notice the 5 missing pins on the bottom.
New Taillight harness, I believe the bottom 5 wires are the camera.
Truck body harness. Clearly those same 5 wires do not exist on the body harness side.
Fuse box side of the body harness. Notice the top 5 wires.
Engine compartment end of the body harness. Notice the 5 missing pins on the bottom.
#12
08-23-2011, 08:03 AM
Nice pics, wish I had the same for my 2011. It seems like the wire color is different from 2010 to 2011. Called Tasca ford to order the body harness and they informed me that there is no other harness for my truck and the wires should be there. The cam wires clearly do not continue into the body harness so they ordered a new one to see if it was an error in product of the harness on my truck. The Camera wires for my 2011 are Green/White,Brown/Violet,Violet,Grey/Violet,Black/Green. They also told me I would not need the headliner harness since my truck already has the 16 pin connector and the only other option would be an 8 pin so we will see.
New Taillight harness, I believe the bottom 5 wires are the camera.
Truck body harness. Clearly those same 5 wires do not exist on the body harness side.

Fuse box side of the body harness. Notice the top 5 wires.

Engine compartment end of the body harness. Notice the 5 missing pins on the bottom.
New Taillight harness, I believe the bottom 5 wires are the camera.
Truck body harness. Clearly those same 5 wires do not exist on the body harness side.
Fuse box side of the body harness. Notice the top 5 wires.
Engine compartment end of the body harness. Notice the 5 missing pins on the bottom.
#13
08-23-2011, 08:10 AM
Locations
The first pic is the taillight harness and the second pic is the body harness. These two plug into one another at the rear of the truck near the spare tire just off to the drive side a bit. The fuse box end of the body harness is in the engine compartment on the drivers side up near the firewall, it plugs into the body harness from rear there.
#14
08-23-2011, 08:44 AM
The first pic is the taillight harness and the second pic is the body harness. These two plug into one another at the rear of the truck near the spare tire just off to the drive side a bit. The fuse box end of the body harness is in the engine compartment on the drivers side up near the firewall, it plugs into the body harness from rear there.
I sometimes think Ford intentionally does not make some of these option available so that people will be more inclined to buy a higher level truck to get some of these options. On the other-hand, it seem that it could possible reduce costs if they made one standard wire harness for all models with less inventory and less handling of different parts.
In other words I think Ford spends a fair amount of effort specifically to prevent interchangeability. Sometimes it can be a little confusing.
E.g., When I had my 2007 XLT Screw I wanted to add an OEM subwoofer. I kept hearing that the wire harness is in all trucks for the subwoofer. That was not true in my truck but a neighbor that had an �07 XLT Screw did have the harness that was under the carpet near where the subwoofer mounted. I had to make my harness. We checked and sure enough, my truck was built in KC and his was built in Dearborn MI. This situation can exist when they may have a part shortage.
Sometimes I think that were the truck was built and that some build sheets from different assembly plants can vary. Some of the information does actually get overlooked by the engineers on occasion.
I know these thing because I worked for an automotive supplier in Michigan for 15 years. It wasn't frequently but things like that do happen.
#15
08-23-2011, 08:56 AM
Interesting and I do believe there was two options for where this harness was made. The one on my truck says Mexico but Tasca said either KC or Dearborn. Hopefully this is the case and the new one will have the right wires. Fortunately they are going to look at the harness for me when it comes in before they charge me and ship it out. I also paid 18 bucks on that JustAnswer.com to see if I could get my hands on the wiring diagrams, this was to no avail.