Ford Escape Driveshaft separated cv Joint at PTO case, Please HELP.
#1
 11-14-2010, 07:55 AM


Ford Escape Driveshaft separated cv Joint at PTO case, Please HELP.
Ok,
Replacing the u joints... I should have just left this one to the shop.. I had a bad feeling but then went and did it anyway.
The rear one was less than an hour. The center (front) one just in front of the carrier bearing would not come out with my press. So I had to remove the shaft.
I was following the shop cd, and what I read online. Except instead of the front drive shaft pulling out of the PTO (Transfer) tcase... it separated at the joint. This is just like a cv joint.. but I think the entire shaft may have to be replaced if its not fixable.
The questions are:
A) Is this fixable by me possibly, OR at least a shop (maybe transmission) can fix it?
B) If its not fixable and the solution is to replace the front drive shaft... I believe I then have to replace the back shaft as well, as they are weighted together... Is this correct?
C) Can I drive it without the driveshaft in? Obviously these are front wheel drive first... What would I have to do to make this safe and not harm the truck. Until I can get this figured out.
Any help will be GREATLY appreciated... I turned this $150 shop job into what I thought was going to be $25 and 2 hours into a pure nightmare.. I really dont have the money to fix this right now.
Please any help will be appreciated. If anyone needs pictures I will get them right away.
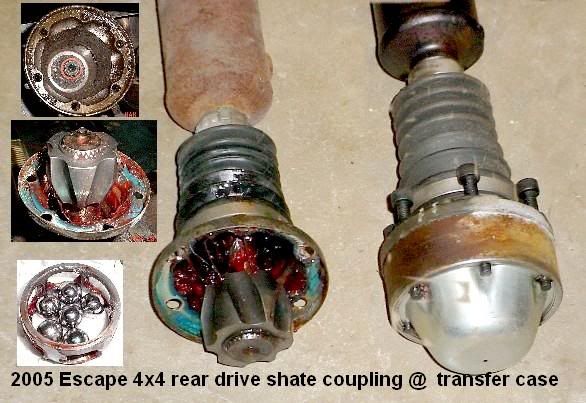
Here is a picture of the broken part. This is not my part its just a pic I found online.

Replacing the u joints... I should have just left this one to the shop.. I had a bad feeling but then went and did it anyway.
The rear one was less than an hour. The center (front) one just in front of the carrier bearing would not come out with my press. So I had to remove the shaft.
I was following the shop cd, and what I read online. Except instead of the front drive shaft pulling out of the PTO (Transfer) tcase... it separated at the joint. This is just like a cv joint.. but I think the entire shaft may have to be replaced if its not fixable.
The questions are:
A) Is this fixable by me possibly, OR at least a shop (maybe transmission) can fix it?
B) If its not fixable and the solution is to replace the front drive shaft... I believe I then have to replace the back shaft as well, as they are weighted together... Is this correct?
C) Can I drive it without the driveshaft in? Obviously these are front wheel drive first... What would I have to do to make this safe and not harm the truck. Until I can get this figured out.
Any help will be GREATLY appreciated... I turned this $150 shop job into what I thought was going to be $25 and 2 hours into a pure nightmare.. I really dont have the money to fix this right now.
Please any help will be appreciated. If anyone needs pictures I will get them right away.
Here is a picture of the broken part. This is not my part its just a pic I found online.
#2
01-02-2011, 05:43 AM

#3
01-02-2011, 09:33 AM
I did get it fixed, however I repaired it. A few things to note. It goes together like any other cv joint. Make sure you use a lubricant intended for cv joints (high pressure). Also I used a high pressure gasket at where the plate meets the bulb. If yours comes apart you will see where this is needed. I put the shaft in a vice and worked on the joint with patience. I have probably 6000-9000 miles on the truck since then and no issues. Thankfully mine was marked for the u joints I was replacing so I knew exactly where to put the bulb back together without potentially effecting the balance. One last thing is I took my time to properly clean out all the old lubricant from the boot and other parts, that was half the project, you don't want lubricants mixing. Also I let the plate and bulb sit overnight to cure. I zip tied it together while the gasket maker cured. Zip ties through the bolt holes. The next day I cut them and installed it.
#4
02-04-2011, 12:05 PM

the trick
 Hi folks,
My buddy and I found this site while researching how to reassemble the drive shaft cv joint on my newly aquired Mazda Tribute. Like the original poster, when we took the drive shafts down to be able to get the u-joints off, the cv joint (cage and *****) came out of the female (gear cup) and separated from the male end of the drive shaft. Putting it back together was a nightmare until we were told by a friendly mechanic how to do it.
It is easier to do this job in a vice. However, if the "female" section of the cv joint is stuck on the output shaft like mine was; doing it in a vice is not an option. The "female" section is seated on a piece that is attached to the output of the transmission. It is seated in that piece with what seems like an interference fit and the bolts that hold the cv joint assembly together. In other words, when you remove the bolts, the cv joint could be taken off the output piece as an assembly (with a lot of effort), or it may be taken apart, leaving the female section in place (which is done with very little effort). I suspect the female piece on my car is just corroded on. In any event, we couldn't get it off using heat, hammers and a pipe wrench (although not excessively). So we reassembled it in place.
To do this: clean all the old grease off all surfaces (clean it well). Use new high pressure grease to pack the female section and to install the cage and ***** onto the male section. There is a product called Red and Tacky that works great. Putting the unit back in is a two man operation. We used a vise grip attached to the shaft (aft of the cv joint) to hold the cv joint boot and flange back far enough to be able to see the male gear (and cv joint cage & *****) as they are engaged in the female gear cup. Looking forward, line up the male end (drive shaft) with the female grooves (look closely at the unit while it is apart to clearly understand what the symetry of the grooves looks like). One person holds the shaft up and the other feeds it into the cup. This is where the person holding the cv joint end has to be attentive. The ***** should stay in place if greased properly, but they may tend to be pushed out. Great attention to detail is needed to make sure they all stay in while the unit is being engaged into the female section.
HERE IS THE SECRET: looking forward; the shaft should be positioned so the male gear is close to engaged (with the female - cup) at the front, while the rear of the shaft is angled down and left a pretty fair amount (while at the same time not pulling the gears too far apart). The amount of "angularity" should be determined by the person holding the gear end, who should have their face close enough to the gears to be able to see clearly what is going on. Go slow and communicate much. Slowly engage the gear/*****/cage into the cup (obviously the alignment of all these parts is crucial). Once the *****/cage and gear are started into the cup; slowly push forward on the shaft while at the same time, rotating the shaft upward and to the right. The person holding the front end really needs to be aware of the ***** to make sure they are feeding into the female grooves and not being pushed out. Feed the shaft in slowly and wiggle the shaft slightly to make sure it continues in. It should have the right "feel" as it goes in. Once all the way in, articulate the shaft around (but not too wide an arc) to make sure it is seated. Get the bolts installed quickly. Use locktite and torque to the required spec (I believe it is 27 ft-lb). Once in, the shaft should have fore & aft play and quite a bit of rotational movement, but it should not come out. It is quite obvious when the gears become separated.
PITTFALLS: the cage & ***** may be pushed off the gear in the aft direction. The cage and ***** may be too far forward on the gear (pushed too far into the female end) and fall off inside the cup. If the trick is not done correctly, the unit will be pushed in and become bound up tight (very tight).
We ran into all the pittfalls on the first evening. After researching the solution, we fit the unit up in one try. It could be just good luck, but maybe the trick is infallible. Good luck.
#5
07-11-2012, 05:50 PM

I am having a heck of a time trying to get the CV joint back together on my 01 escape. I'm trying to follow what you are saying Ching-Chang but can't picture in my mind exactly how you did it. Snake2715 if you are still around maybe you have some tips. I pulled the CV joint apart trying to "pull" the shaft out of the transfer case as if it has a slip yoke. I now have the whole driveline out and the CV joint is apart and I am having a heck of a time trying to get it back together. I know Snake2715 says it is like any other CV joint but I never pulled one apart or rebuilt one. Help from anyone would be appreciated.
#6
10-30-2013, 07:57 PM

#7
11-03-2014, 04:51 PM

Followed some of the advice in this thread. Pretty good detail but was unsuccessful trying to the CV back together while the female can was still connected to the transfer case. Couldn't get it to budge but followed some other advice on the web which indicated using a floor jack to lift on the back portion of the cv "can" (outer raceway). Then use a hammer to bang the sides. A couple of whacks and the "can" falls off from the transfer case receiver. Once you got the thing on a bench, its reasonably easy to get the bearings back into place following some of the advice given herein by the post by ching chang. First clean the existing grease from the parts. Carefully take of the end cap from the female "can" / outer raceway. IF you are lucky, the cork gasket won't get damage and you will be able to reuse, otherwise during final assembly, you will likely have to make a gasket with gasket maker (this will adds some time to the end assembly waiting for it to cure). Basically use a vise grip to hold the boot and end cap away from the male bearing raceway. In "dry mode" (ie. no grease), slide the bearing holder over the inner raceway (male / shaft) and place the six bearing in the raceway. Note, the propeller / drive shaft is held horizontally in vice. Use you hand to cup the lower bearings to prevent them falling out. Take the outer race way (without its end cap) and try to feed one of the top bearings into the appropriate raceway. You will likely have to tilt the outer raceway a bit to get this to work. Similarly, you try align the next bearing. You continue until they are all seated and the outer raceway is now maybe 1/4 - 1/2 over the inner one.
When things and the raceways are aligned correctly, the joint will articulate fairly easily in all direction. Of course, you then have to watch or you will have the same problem that you started out with (ie. the two raceways detaching and bearings rolling out everywhere).
IF the joint is not put together properly... it is possible to get the bearings and the raceways together BUT you will find that the joint won't budge... the bearing gage will move / rotate, but the shaft will not. IF you look at the raceways in this "mode" you will see that the inner and outer raceways are "totally aligned".... this IS wrong. Look at a on-line picture of the dorman 932-202 CV joint. Notice in the picture that the outer raceway have two close together slots, wider space, and two close together slots, etc... while the inner raceway's wider space "aligns" with the "close" together slots of the outer raceway. That's what you are attempting to achieve. Once you are sure that you have good articulation, pack the unit with grease and put on the female end cap (either re-using the existing gasket or making a new one). Use the bolts to guide the boot cap and the end cap on to the "can". You are basically done and can now put the unit back into the transfer case receiver.
Of course, my "successful first struggle" ended up with the "total lockup" mode". The subsequent attempt (s) ended with success with the appropriate alignment.
Hope this helps or at least adds to the help provided in this thread.

Thread
Thread Starter
Forum
Replies
Last Post
Koreyellett1
1973 - 1979 F-100 & Larger F-Series Trucks
33
03-14-2016 06:59 PM
little.dude
Clutch, Transmission, Differential, Axle & Transfer Case
4
02-04-2016 07:20 PM
78 PEB
1973 - 1979 F-100 & Larger F-Series Trucks
24
03-31-2014 06:53 AM